- [자료구조] ch 1. 자료구조 소개
- [자료구조] ch 3. 알고리즘의 성능
- [자료구조] ch 4. 자바 기초
- [자료구조] ch 5. 리스트
- [자료구조] ch 6. 큐
- [자료구조] ch 7. 스택
- [자료구조] ch 8. 힙
- [자료구조] ch 9. 선택정렬, 버블정렬, 삽입정렬
- [자료구조] ch 9. 병합정렬, 퀵정렬, 힙정렬, 셸정렬
- [자료구조] ch 9. 계수정렬, 기수정렬, 버킷정렬
- [자료구조] ch 10. 색인과 이진 검색 트리
- [자료구조] ch 11. 균형검색트리
- [자료구조] ch 12. 해시테이블
- [자료구조] ch 13. 그래프
- [자료구조] ch 13. 그래프 2
[자료구조] ch 7. 스택
스택
스택은 가장 뒤에 들어온 데이터가 가장 먼저 나가는 LIFO 형식입니다. 키보드의 입력과 삭제, 웹페이지 간 이동(뒤로가기, 앞으로가기) 등이 스택 구조라고 볼 수 있습니다.
또한 다음과 같은 JVM 에서 가상 메모리 구조 중 스택 영역도 스택 메모리 형식입니다.
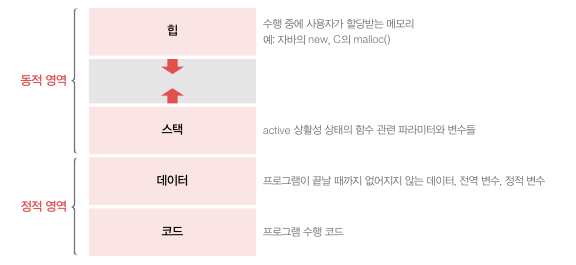
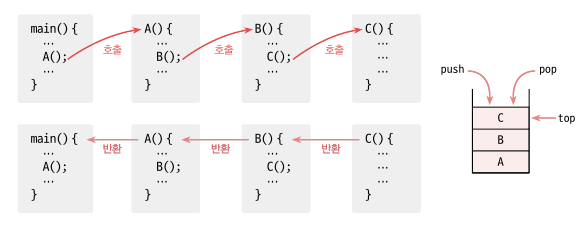
먼저 main() 메서드는 정적영역의 데이터 영역에 저장됩니다. 그리고 차례대로 호출되는 메서드는 나중에 들어간 메서드가 제일 먼저 끝나는 스택 구조입니다. 다음과 같습니다.
배열을 이용한 스택
배열을 이용한 스택은 배열 stack[0 … n-1] 과 topIndex 를 가집니다. topIndex 의 값은 처음에는 원소가 없다는 의미로 -1 로 세팅합니다.
배열 구현
스택 인터페이스
package datastructure.stack;

public interface StackInterface<E> {
    void push(E newItem);
    E pop();
    E top();
    boolean isEmpty();
    void popAll();
}
top() 은 peek() 입니다.
배열 스택 구현
전체적인 구조입니다.
public class ArrayStack<E> implements StackInterface<E> {

    private E[] stack;
    private int topIndex;
    private static final int DEFAULT_CAPACITY = 64;

    public ArrayStack(){
        stack = (E[]) new Object[DEFAULT_CAPACITY];
        topIndex = -1;
    }

    @Override
    public void push(E newItem) {
        if(isFull()) throw new CustomException();
        stack[++topIndex] = newItem;
    }

    @Override
    public E pop() {
        if(topIndex == -1) throw new CustomException();
        return stack[topIndex--];
    }

    @Override
    public E top() {
        if(topIndex == -1) throw new CustomException();
        return stack[topIndex];
    }

    public boolean isFull(){
        return topIndex == stack.length - 1;
    }

    @Override
    public boolean isEmpty() {
        return topIndex == -1;
    }

    @Override
    public void popAll() {
        stack = (E[]) new Object[stack.length];
        topIndex = -1;
    }
}
- 필드로 E 타입을 가지는 배열, topIndex, DEFAULT_CAPACITY 가 있습니다.
간단하게 메서드를 쪼개서 보겠습니다.
push()
@Override
public void push(E newItem) {
    if(isFull()) throw new CustomException();
    stack[++topIndex] = newItem;
}
데이터 추가 메서드입니다. isFull 이면 Exception 을 던지고, 아니면 topIndex 에 1을 더하고 newItem 을 할당합니다.
pop()
@Override
public E pop() {
    if(topIndex == -1) throw new CustomException();
    return stack[topIndex--];
}
데이터를 빼내는 메서드입니다. topIndex 가 -1 이면 데이터가 없으므로 Exception 을 던지고, 아니면 topIndex 의 값을 리턴합니다. 이후 topIndex– 를 합니다.
top()
@Override
public E top() {
    if(topIndex == -1) throw new CustomException();
    return stack[topIndex];
}
제일 위의 데이터를 확인하는 메서드입니다. opIndex 가 -1 이면 데이터가 없으므로 Exception 을 던지고, 아니면 topIndex 의 값을 리턴합니다.
popAll()
@Override
public void popAll() {
    stack = (E[]) new Object[stack.length];
    topIndex = -1;
}
모든 값을 꺼내고 stack 을 초기화 합니다. topIndex = -1 로 해도 초기화는 되지만, 각 배열의 참조값이 없어지지는 않습니다. 그렇게 되면 GC 가 작동하지 않아 메모리 낭비가 발생하므로 stack 배열까지 초기화해줍니다.
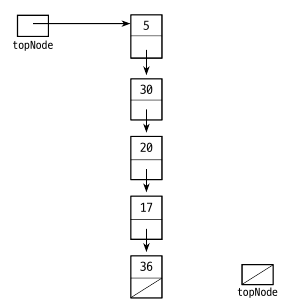
연결 리스트를 이용한 스택
연결리스트에서는 topNode 를 선언한 후에 제일 위의 Node 를 가리키면 됩니다. 각 노드는 자신의 밑에 있는 노드를 가리키고 있어야 합니다.
연결 리스트 스택 구현
package datastructure.stack.linkedstack;

import datastructure.common.CustomException;
import datastructure.common.Node;
import datastructure.stack.StackInterface;

public class LinkedStack<E> implements StackInterface<E> {

    Node<E> topNode;

    public LinkedStack(){
        topNode = null;
    }

    @Override
    public void push(E newItem) {
        topNode = new Node<>(newItem, topNode);
    }

    @Override
    public E pop() {
        if(isEmpty()) throw new CustomException();
        Node<E> temp = topNode;
        topNode = topNode.next;
        return temp.item;
    }

    @Override
    public E top() {
        if(isEmpty()) throw new CustomException();
        return topNode.item;
    }

    @Override
    public boolean isEmpty() {
        return topNode == null;
    }

    @Override
    public void popAll() {
        topNode = null;
    }
}
- topNode 를 선언한 후 생성자에서 null 을 넣습니다.
push()
 @Override
public void push(E newItem) {
    topNode = new Node<>(newItem, topNode);
}
새로운 Node 를 만들고 그 노드의 next 값을 topNode 로 넣습니다. 그리고 topNode 를 새로운 노드로 변경해줍니다. 그러면 topNode 레퍼런스는 새로운 Node 를 가리키게 되고, 새로운 Node 의 next 는 이전의 topNode 를 가리키게 됩니다.
pop()
@Override
public E pop() {
    if(isEmpty()) throw new CustomException();
    Node<E> temp = topNode;
    topNode = topNode.next;
    return temp.item;
}
topNode 를 temp 에 임시로 저장해둡니다. 그리고 topNode 의 next 를 topNode 로 지정해줍니다. 임시로 저장해둔 temp 의 item 을 리턴합니다. 메서드가 끝나면 temp 은 없어지고 이전 topNode 는 GC 의 대상이 됩니다.
popAll()
 @Override
public void popAll() {
    topNode = null;
}
topNode 를 null 로 만들면 원래 topNode 의 참조값이 스택에서 없어지게 됩니다. 따라서 연쇄적으로 모든 객체가 GC 의 대상이 되어 삭제됩니다.
다른 클래스를 재사용한 스택
연결리스트를 상속
스택은 다른 컬렉션 타입의 리스트를 상속받아서 간단하게 구현할 수 있습니다. 5장에서 만든 LinkedList
package datastructure.stack.other;

import datastructure.common.CustomException;
import datastructure.list.linkedList.LinkedList;
import datastructure.stack.StackInterface;

public class InheritedStack<E> extends LinkedList<E> implements StackInterface<E> {

    public InheritedStack(){
        super();
    }

    @Override
    public void push(E newItem) {
        super.add(0, newItem);
    }

    @Override
    public E pop() {
        if(isEmpty()) throw new CustomException();
        return super.remove(0);
    }

    @Override
    public E top() {
        if(isEmpty()) throw new CustomException();
        return super.get(0);
    }

    @Override
    public void popAll() {
        super.clear();
    }
}
생성자는 super class 의 기본생성자입니다. 더미 헤드 노드가 있는 연결리스트입니다.
public LinkedList(){
    numItems = 0;
    head = new Node<>(null, null);
}
나머지 메서드는 컬렉션과 비슷합니다. 저는 개인적으로 명확한 걸 좋아해서 super class 의 메서드면 super 를 붙였습니다만, 빼도 무방합니다.
ADT 리스트 사용
이번에는 ADT 리스트를 이용하여 스택 클래스를 만들어보겠습니다. 필드는 list 하나이며 ListInterface
package datastructure.stack.other;

import datastructure.list.ArrayList.ListInterface;
import datastructure.list.linkedList.LinkedList;
import datastructure.stack.StackInterface;

public class ListStack<E> implements StackInterface<E> {

    private ListInterface<E> list;

    public ListStack(){
        list = new LinkedList<>();
    }

    public ListStack(ListInterface<E> list){
        this.list = list;
    }

    @Override
    public void push(E newItem) {
        list.add(0, newItem);
    }

    @Override
    public E pop() {
        return list.remove(0);
    }

    @Override
    public E top() {
        return list.get(0);
    }

    @Override
    public boolean isEmpty() {
        return list.isEmpty();
    }

    @Override
    public void popAll() {
        list.clear();
    }
}
다 비슷한데요. pop, push 를 할 때 isEmpty() 체크를 하지 않았습니다. 어차피 ListInterface 를 구현하는 구현체에 예외처리가 다 되어있기 때문입니다. 또한 생성자 호출 시 ListInterface 구현체를 넣을 수 있게 해서 선택할 수 있도록 만들었습니다. (책에는 따로 없는 내용입니다. 문제점은 있지만 생성자 호출 시 주입한다는 개념만 봐주세요.)


댓글남기기