- 스프링 부트 활용 웹 서버와 서블릿 컨테이너
- 스프링 부트 활용 스프링 부트와 내장 톰캣
- 스프링 부트 활용 스프링 부트 스타터와 라이브러리
- 스프링 부트 활용 자동 구성(auto configuration)
- 스프링 부트 활용 외부설정과 프로필1
- 스프링 부트 활용 외부설정과 프로필2
- 스프링 부트 활용(2) 액츄에이터
- 스프링 부트 활용 마이크로미터, 프로메테우스, 그라파나
- 스프링 부트 활용 모니터링 메트릭 활용
스프링 부트 활용 모니터링 메트릭 활용
inflearn - actuator 프로젝트 사용
0. 메트릭 등록 - 예제 만들기
주문, 주문 취소, 재고량을 확인하는 예제다.
OrderService
package hello.order;

import java.util.concurrent.atomic.AtomicInteger;

public interface OrderService {
    void order();
    void cancel();
    AtomicInteger getStock();
}
OrderServiceV0
package hello.order.v0;

import hello.order.OrderService;
import lombok.extern.slf4j.Slf4j;

import java.util.concurrent.atomic.AtomicInteger;

@Slf4j
public class OrderServiceV0 implements OrderService {

    private AtomicInteger stock = new AtomicInteger(100);

    @Override
    public void order() {
        log.info("order");
        stock.decrementAndGet();
    }

    @Override
    public void cancel() {
        log.info("cancel");
        stock.incrementAndGet();
    }

    @Override
    public AtomicInteger getStock() {
        return stock;
    }
}
new AtomicInteger(100): 초기값을 100으로 설정해둔다. 재고 수량이 100부터 시작한다고 가정한다.
OrderConfigV0
package hello.order.v0;

import hello.order.OrderService;
import org.springframework.context.annotation.Bean;
import org.springframework.context.annotation.Configuration;

@Configuration
public class OrderConfigV0 {

    @Bean
    OrderService orderService() {
        return new OrderServiceV0();
    }
}
OrderController
package hello.controller;


import hello.order.OrderService;
import lombok.extern.slf4j.Slf4j;
import org.springframework.web.bind.annotation.GetMapping;
import org.springframework.web.bind.annotation.RestController;

@Slf4j
@RestController
public class OrderController {

    public final OrderService orderService;


    public OrderController(OrderService orderService) {
        this.orderService = orderService;
    }

    @GetMapping("/order")
    public String order(){
        log.info("order");
        orderService.order();
        return "order";
    }

    @GetMapping("/cancel")
    public String cancel(){
        log.info("cancel");
        orderService.cancel();
        return "cancel";
    }

    @GetMapping("/stock")
    public int stock(){
        log.info("stock");
        return orderService.getStock().get();
    }
}
ActuatorApplication
package hello;

import hello.order.v0.OrderConfigV0;
import org.springframework.boot.SpringApplication;
import org.springframework.boot.actuate.audit.InMemoryAuditEventRepository;
import org.springframework.boot.actuate.web.exchanges.InMemoryHttpExchangeRepository;
import org.springframework.boot.autoconfigure.SpringBootApplication;
import org.springframework.context.annotation.Bean;
import org.springframework.context.annotation.Import;

@SpringBootApplication(scanBasePackages = "hello.controller")
@Import(OrderConfigV0.class)
public class ActuatorApplication {

    public static void main(String[] args) {
        SpringApplication.run(ActuatorApplication.class, args);
    }

    @Bean
    public InMemoryHttpExchangeRepository httpExchangeRepository() {
        return new InMemoryHttpExchangeRepository();
    }

}
1. 메트릭 등록1 - 카운터
마이크로미터를 사용해서 메트릭을 직접 등록하는 방법을 알아보자. 먼저 주문수, 취소수를 대상으로 카운터 메트릭을 등록해보자.
MeterRegistry
마이크로미터 기능을 제공하는 핵심 컴포넌트. 스프링을 통해서 주입 받아서 사용하고, 이곳을 통해서 카운터, 게이지 등을 등록한다.
Counter(카운터)
- 단조롭게 증가하는 단일 누적 측정항목
- 프로메테우스에서는 일반적으로 카운터의 이름 마지막에 _total 을 붙여서 my_order_total 과 같이 표현함
주문수 취소수 서비스에 카운터 메트릭을 적용
OrderServiceV1
package hello.order.v1;

import hello.order.OrderService;
import io.micrometer.core.instrument.Counter;
import io.micrometer.core.instrument.MeterRegistry;
import lombok.extern.slf4j.Slf4j;

import java.util.concurrent.atomic.AtomicInteger;

@Slf4j
public class OrderServiceV1 implements OrderService {

    private final MeterRegistry registry;
    private AtomicInteger stock = new AtomicInteger(100);

    public OrderServiceV1(MeterRegistry registry) {
        this.registry = registry;
    }

    @Override
    public void order() {
        log.info("order");
        stock.decrementAndGet();

        Counter.builder("my.order")
                .tag("class", this.getClass().getSimpleName())
                .tag("method", "order")
                .description("order")
                .register(registry).increment();
    }

    @Override
    public void cancel() {
        log.info("cancel");
        stock.incrementAndGet();

        Counter.builder("my.order")
                .tag("class", this.getClass().getSimpleName())
                .tag("method", "cancel")
                .description("order")
                .register(registry).increment();
    }

    @Override
    public AtomicInteger getStock() {
        return stock;
    }
}
Counter.builder(name)를 통해서 카운터를 생성한다.name에는 메트릭 이름을 지정한다.tag를 사용했는데, 프로메테우스에서 필터할 수 있는 레이블로 사용된다.- 주문과 취소는 메트릭 이름은 같고 tag 를 통해서 구분하도록 했다.
register(registry): 만든 카운터를 MeterRegistry 에 등록한다. 이렇게 등록해야 실제 동작한다.increment(): 카운터의 값을 하나 증가한다.
OrderConfigV1
package hello.order.v1;

import hello.order.OrderService;
import io.micrometer.core.instrument.MeterRegistry;
import org.springframework.context.annotation.Bean;
import org.springframework.context.annotation.Configuration;

@Configuration
public class OrderConfigV1 {

    @Bean
    OrderService orderService(MeterRegistry registry) {
        return new OrderServiceV1(registry);
    }
}
ActuatorApplication - 수정
package hello;

import hello.order.v1.OrderConfigV1;
import org.springframework.boot.SpringApplication;
import org.springframework.boot.actuate.web.exchanges.InMemoryHttpExchangeRepository;
import org.springframework.boot.autoconfigure.SpringBootApplication;
import org.springframework.context.annotation.Bean;
import org.springframework.context.annotation.Import;

@SpringBootApplication(scanBasePackages = "hello.controller")
@Import(OrderConfigV1.class)
public class ActuatorApplication {

    public static void main(String[] args) {
        SpringApplication.run(ActuatorApplication.class, args);
    }

    @Bean
    public InMemoryHttpExchangeRepository httpExchangeRepository() {
        return new InMemoryHttpExchangeRepository();
    }

}
- OrderConfigV0 -> OrderConfigV1 이 설정되도록 변경한다.
실행
주문과 취소를 각각 한번씩 실행한 다음에 메트릭을 확인해보자. (각각 실행해야 메트릭이 등록된다.)
액츄에이터 메트릭 확인
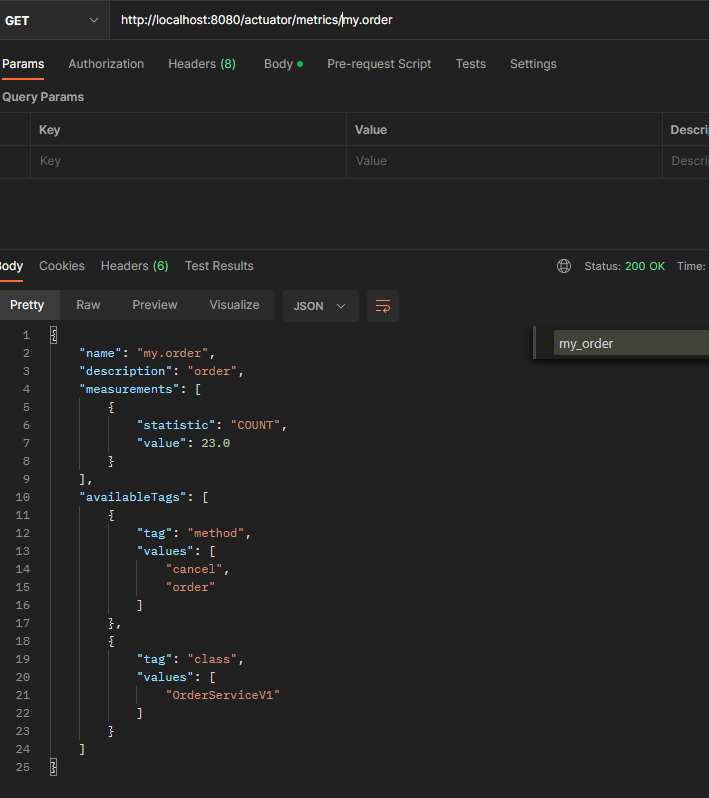
- 메트릭을 확인해보면 method 로 구분할 수 있다.
프로메테우스 포멧 메트릭 확인
http://localhost:8080/actuator/prometheus
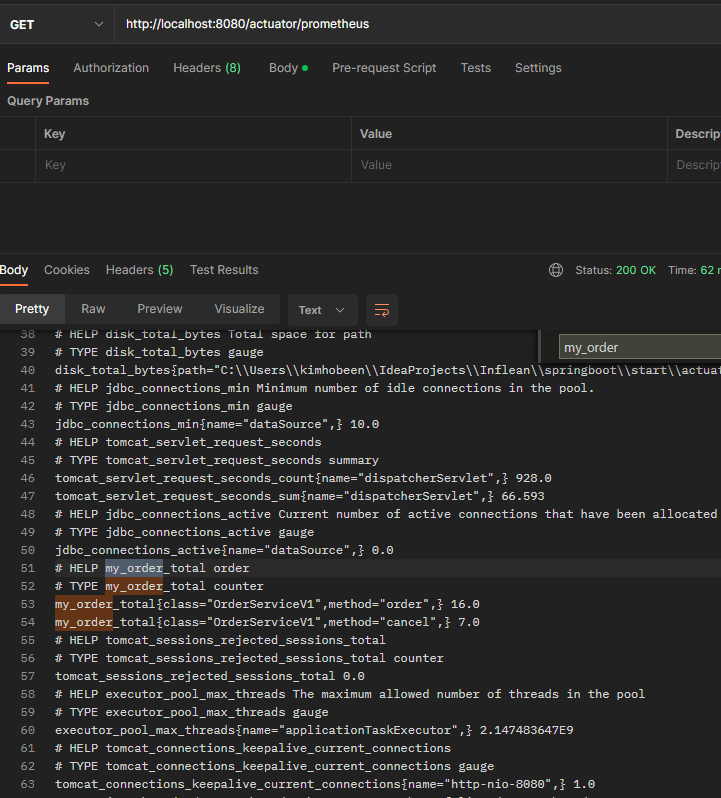
- 메트릭 이름이 my.order my_order_total 로 변경된 것을 확인할 수 있다.
그라파나 등록 - 주문수, 취소수
- Title : 주문수
increase(my_order_total{method="order"}[1m])/ Legend : ``increase(my_order_total{method="cancel"}[1m])/ Legend : ``
참고: 카운터는 계속 증가하기 때문에 특정 시간에 얼마나 증가했는지 확인하려면 increase() , rate() 같은 함수와 함께 사용하는 것이 좋다.

2. 메트릭 등록2 - @Counted
AOP 를 활용해서 Service 클래스의 메트릭 등록을 분리해보자. 마이크로미터는 이런 상황에 맞추어 필요한 AOP 구성요소를 이미 다 만들어두었다.
OrderServiceV2
package hello.order.v2;

import hello.order.OrderService;
import io.micrometer.core.annotation.Counted;
import lombok.extern.slf4j.Slf4j;

import java.util.concurrent.atomic.AtomicInteger;

@Slf4j
public class OrderServiceV2 implements OrderService {

    private AtomicInteger stock = new AtomicInteger(100);

    @Counted("my.order")
    @Override
    public void order() {
        log.info("order");
        stock.decrementAndGet();

    }

    @Counted("my.order")
    @Override
    public void cancel() {
        log.info("cancel");
        stock.incrementAndGet();

    }

    @Override
    public AtomicInteger getStock() {
        return stock;
    }
}
@Counted애노테이션을 측정을 원하는 메서드에 적용한다. 주문과 취소 메서드에 적용했다.- 그리고 메트릭 이름을 지정하면 된다. 여기서는 이전과 같은
my.order를 적용했다. - 이렇게 사용하면
tag에method를 기준으로 분류해서 적용한
OrderConfigV2
package hello.order.v2;

import hello.order.OrderService;
import io.micrometer.core.aop.CountedAspect;
import io.micrometer.core.instrument.MeterRegistry;
import org.springframework.context.annotation.Bean;
import org.springframework.context.annotation.Configuration;

@Configuration
public class OrderConfigV2 {

    @Bean
    public OrderService orderService() {
        return new OrderServiceV2();
    }

    @Bean
    public CountedAspect countedAspect(MeterRegistry registry) {
        return new CountedAspect(registry);
    }
}
- CountedAspect 를 등록하면 @Counted 를 인지해서 Counter 를 사용하는 AOP를 적용한다.
Metrics 확인
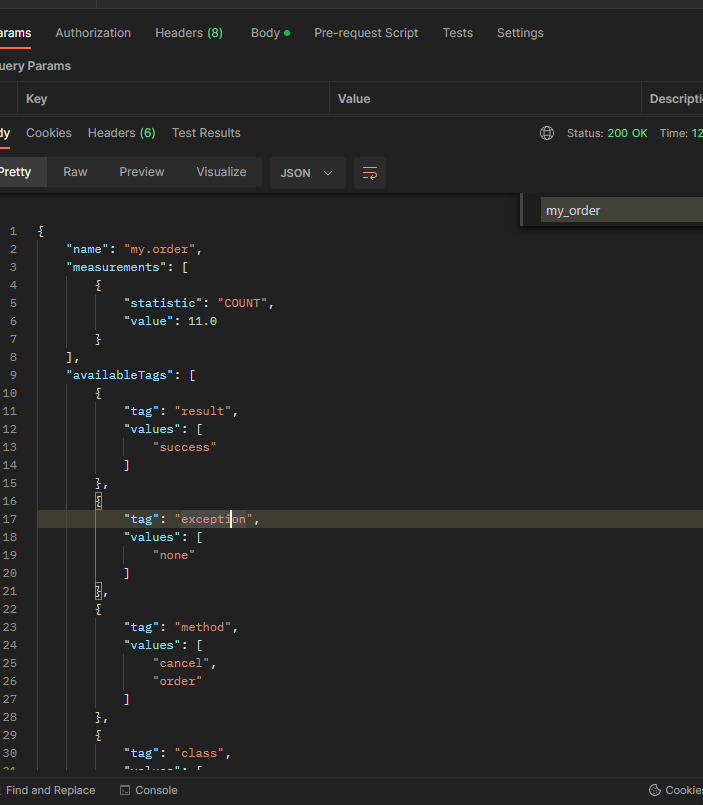
@Counted를 사용하면 result , exception , method , class 같은 다양한tag를 자동으로 적용한다.
3. 메트릭 등록3 - Timer
Timer
Timer는 좀 특별한 메트릭 측정 도구인데, 시간을 측정하는데 사용된다.
Timer 는 다음과 같은 내용을 한번에 측정해준다.
seconds_count: 누적 실행 수 - 카운터seconds_sum: 실행 시간의 합 - sumseconds_max: 최대 실행 시간(가장 오래걸린 실행 시간) - 게이지- 내부에 타임 윈도우라는 개념이 있어서 1~3분 마다 최대 실행 시간이 다시 계산된다.
OrderServiceV3
package hello.order.v3;

import hello.order.OrderService;
import io.micrometer.core.instrument.Counter;
import io.micrometer.core.instrument.MeterRegistry;
import io.micrometer.core.instrument.Timer;
import lombok.extern.slf4j.Slf4j;

import java.util.Random;
import java.util.concurrent.atomic.AtomicInteger;

@Slf4j
public class OrderServiceV3 implements OrderService {

    private final MeterRegistry registry;
    private AtomicInteger stock = new AtomicInteger(100);

    public OrderServiceV3(MeterRegistry registry) {
        this.registry = registry;
    }

    @Override
    public void order() {
        Timer timer = Timer.builder("my.order")
                .tag("class", this.getClass().getSimpleName())
                .tag("method", "order")
                .description("order")
                .register(registry);

        timer.record(() -> {
            log.info("order");
            stock.decrementAndGet();
            sleep(500);
        });

    }

    @Override
    public void cancel() {
        Timer timer = Timer.builder("my.order")
                    .tag("class", this.getClass().getSimpleName())
                    .tag("method", "cancel")
                    .description("order")
                    .register(registry);

        timer.record(() -> {
            log.info("cancel");
            stock.incrementAndGet();
            sleep(200);
        });
    }

    @Override
    public AtomicInteger getStock() {
        return stock;
    }

    private static void sleep(int l) {
        try {
            Thread.sleep(l + new Random().nextInt(200));
        } catch (InterruptedException e) {
            throw new RuntimeException(e);
        }
    }
}
- Timer.builder(name) 를 통해서 타이머를 생성한다.
name에는 메트릭 이름을 지정한다. register(registry): 만든 타이머를MeterRegistry에 등록한다. 이렇게 등록해야 실제 동작한다.- 타이머를 사용할 때는
timer.record()를 사용하면 된다. 그 안에 시간을 측정할 내용을 함수로 포함하면 된다.
* 걸리는 시간을 확인하기 위해 주문은 0.5초, 취소는 0.2초 대기하도록 했다.
OrderConfigV3
package hello.order.v3;

import hello.order.OrderService;
import hello.order.v1.OrderServiceV1;
import io.micrometer.core.instrument.MeterRegistry;
import org.springframework.context.annotation.Bean;
import org.springframework.context.annotation.Configuration;

@Configuration
public class OrderConfigV3 {

    @Bean
    OrderService orderService(MeterRegistry registry) {
        return new OrderServiceV3(registry);
    }
}
실행
주문과 취소를 각각 한번씩 실행한 다음에 메트릭을 확인해보자.
액츄에이터 메트릭 확인
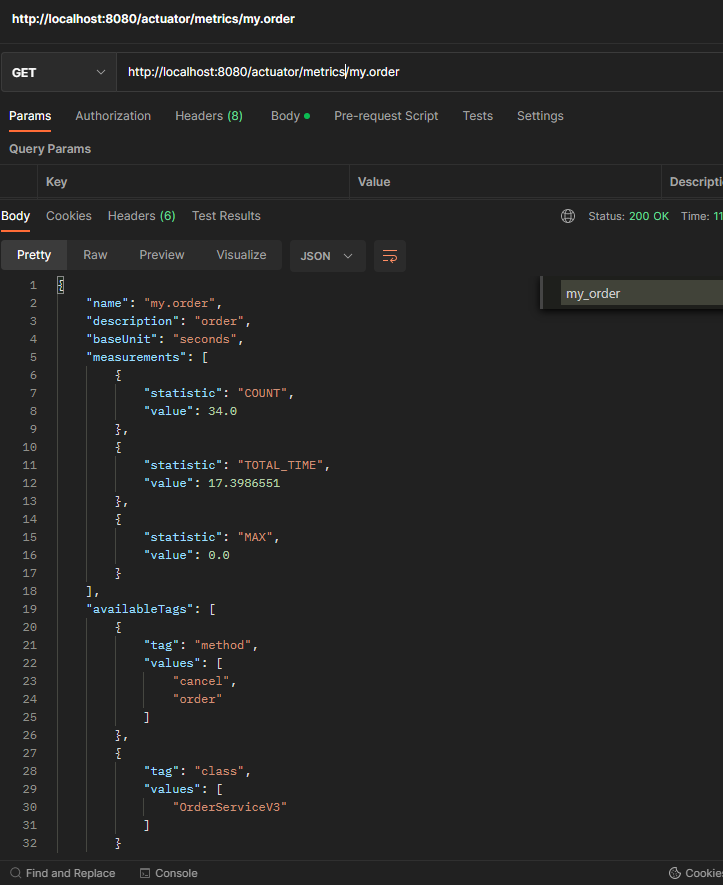
- measurements 항목을 보면 COUNT, TOTAL_TIME, MAX 이렇게 총 3가지 측정 항목을 확인할 수 있다.
그라파나 등록
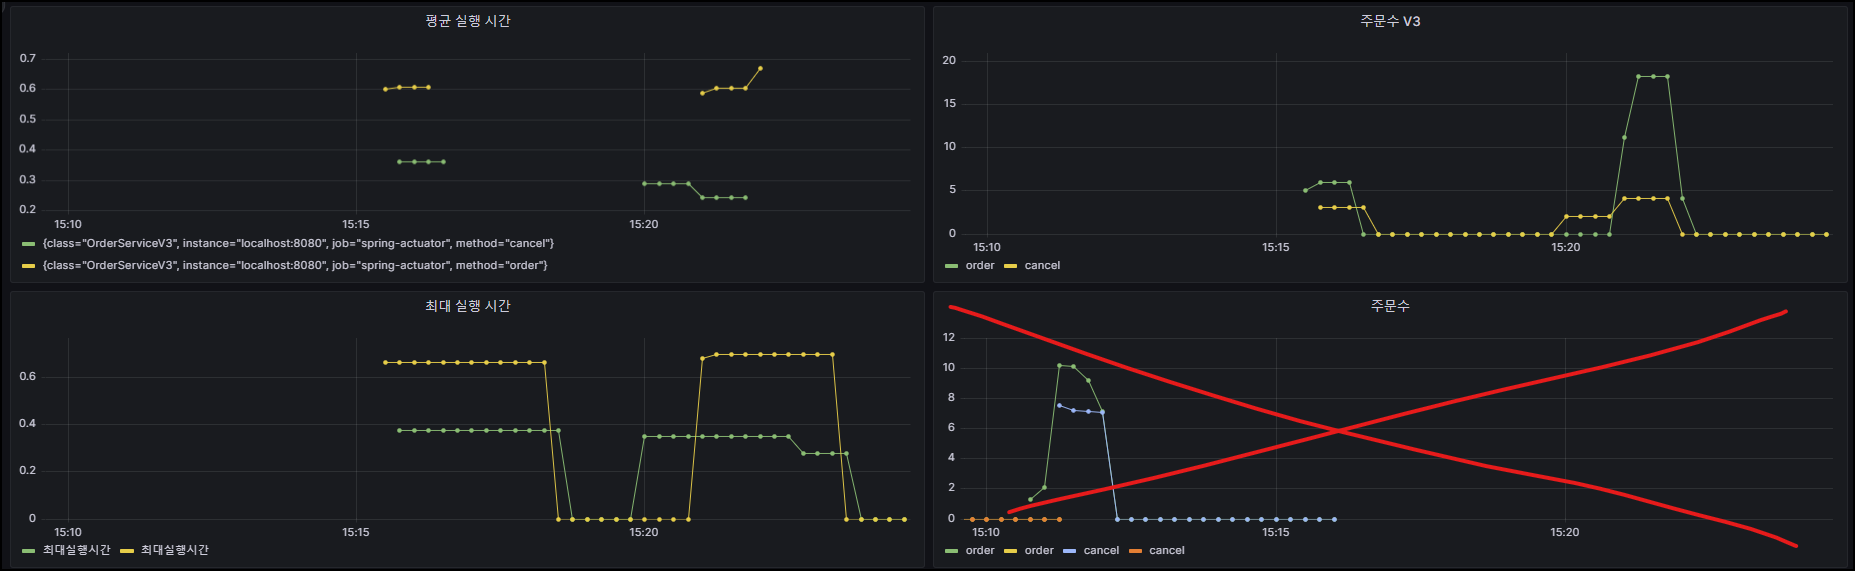
- 평균 실행 시간 :
increase(my_order_seconds_sum[1m]) / increase(my_order_seconds_count[1m]) - 주문수
increase(my_order_seconds_count{method="order"}[1m])/ Legend : ``increase(my_order_seconds_count{method="cancel"}[1m])/ Legend : ``
- 최대 실행시간 :
my_order_seconds_max
4. 메트릭 등록4 - @Timed
타이머는 @Timed 라는 애노테이션을 통해 AOP를 적용할 수 있다.
OrderServiceV4
package hello.order.v4;

import hello.order.OrderService;
import io.micrometer.core.annotation.Timed;
import io.micrometer.core.instrument.MeterRegistry;
import io.micrometer.core.instrument.Timer;
import lombok.extern.slf4j.Slf4j;

import java.util.Random;
import java.util.concurrent.atomic.AtomicInteger;

@Slf4j
@Timed("my.order")
public class OrderServiceV4 implements OrderService {

    private AtomicInteger stock = new AtomicInteger(100);

    @Override
    public void order() {

        log.info("order");
        stock.decrementAndGet();
        sleep(500);

    }

    @Override
    public void cancel() {
        log.info("cancel");
        stock.incrementAndGet();
        sleep(200);
    }

    @Override
    public AtomicInteger getStock() {
        return stock;
    }

    private static void sleep(int l) {
        try {
            Thread.sleep(l + new Random().nextInt(200));
        } catch (InterruptedException e) {
            throw new RuntimeException(e);
        }
    }
}
@Timed("my.order"): 타입이나 메서드 중에 적용할 수 있다. 타입에 적용하면 해당 타입의 모든 public 메서드에 타이머가 적용된다. 참고로 이 경우getStock()에도 타이머가 적용된다.
OrderConfigV4
package hello.order.v4;

import hello.order.OrderService;
import hello.order.v2.OrderServiceV2;
import io.micrometer.core.aop.CountedAspect;
import io.micrometer.core.aop.TimedAspect;
import io.micrometer.core.instrument.MeterRegistry;
import org.springframework.context.annotation.Bean;
import org.springframework.context.annotation.Configuration;

@Configuration
public class OrderConfigV4 {

    @Bean
    public OrderService orderService() {
        return new OrderServiceV4();
    }

    @Bean
    public TimedAspect timedAspect(MeterRegistry registry) {
        return new TimedAspect(registry);
    }
}
액츄에이터 메트릭 확인
http://localhost:8080/actuator/metrics/my.order
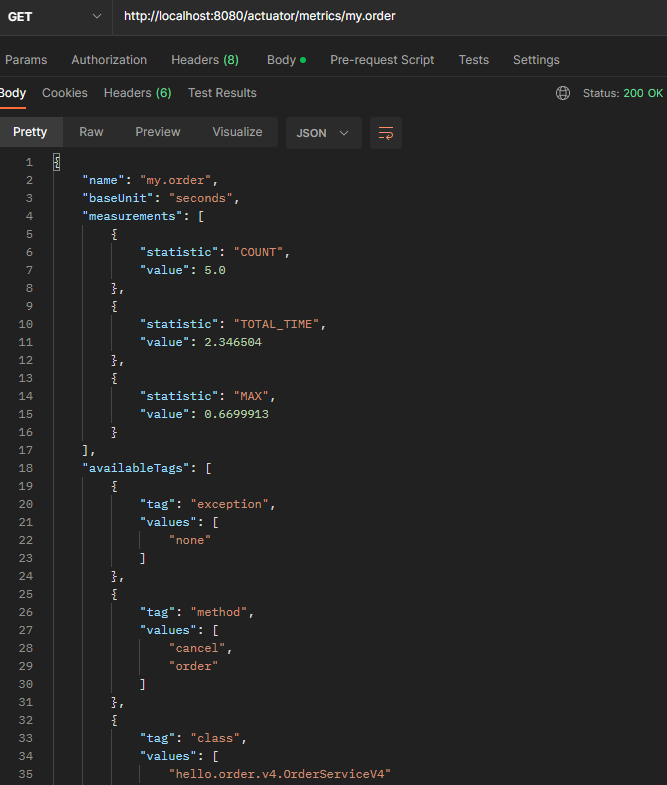
- exception 태크까지 있는 것을 확인할 수 있다.
그라파나 대시보드 확인
- 메트릭 이름과
tag가 기존과 같으므로 같은 대시보드에서 확인할 수 있다.
5. 메트릭 등록5 - 게이지
Gauge(게이지)
게이지는 임의로 오르내릴 수 있는 단일 숫자 값을 나타내는 메트릭이다. 예) 차량의 속도, CPU 사용량, 메모리 사용량
StockConfigV1
StockConfigV1
- 다음과 같이 inner class 를 생성하여 config 하나로 등록할 수 있다.
package hello.order.gauge;

import hello.order.OrderService;
import io.micrometer.core.instrument.Gauge;
import io.micrometer.core.instrument.MeterRegistry;
import jakarta.annotation.PostConstruct;
import lombok.extern.slf4j.Slf4j;
import org.springframework.context.annotation.Bean;
import org.springframework.context.annotation.Configuration;

@Configuration
public class StockConfigV1 {

    @Bean
    public MyStockMetric myStockMetric(OrderService orderService, MeterRegistry registry){
        return new MyStockMetric(orderService, registry);
    }

    @Slf4j
    static class MyStockMetric{
        private OrderService orderService;
        private MeterRegistry registry;

        public MyStockMetric(OrderService orderService, MeterRegistry registry) {
            this.orderService = orderService;
            this.registry = registry;
        }

        @PostConstruct
        public void init(){
            Gauge.builder("my.stock", orderService, service -> {
                log.info("stock gauge call");
                return service.getStock().get();
            }).register(registry);
        }
    }
}
my.stock이라는 이름으로 게이지를 등록했다.- 게이지를 만들 때 함수를 전달했는데, 이 함수는 외부에서 메트릭을 확인할 때 마다 호출된다. 이 함수의 반환 값이 게이지의 값이다.
ActuatorApplication - 변경
package hello;

import hello.order.gauge.StockConfigV1;
import hello.order.gauge.StockConfigV2;
import hello.order.v1.OrderConfigV1;
import hello.order.v2.OrderConfigV2;
import hello.order.v3.OrderConfigV3;
import hello.order.v4.OrderConfigV4;
import org.springframework.boot.SpringApplication;
import org.springframework.boot.actuate.web.exchanges.InMemoryHttpExchangeRepository;
import org.springframework.boot.autoconfigure.SpringBootApplication;
import org.springframework.context.annotation.Bean;
import org.springframework.context.annotation.Import;

@SpringBootApplication(scanBasePackages = "hello.controller")
@Import({OrderConfigV4.class, StockConfigV1.class})
public class ActuatorApplication {

    public static void main(String[] args) {
        SpringApplication.run(ActuatorApplication.class, args);
    }

    @Bean
    public InMemoryHttpExchangeRepository httpExchangeRepository() {
        return new InMemoryHttpExchangeRepository();
    }
}
실행
- 애플리케이션을 실행하면 stock gauge call 로그가 주기적으로 남는 것을 확인할 수 있다. 게이지를 확인하는 함수는 외부에서 메트릭을 확인할 때 호출 된다. 현재 프로메테우스가 다음 경로를 통해 주기적으로 메트릭을 확인하기 때문이다.
http://localhost:8080/actuator/prometheus - 프로메테우스를 종료해보면 해당 함수가 호출되지 않는 것을 확인할 수 있다. 물론 메트릭 확인 경로를 직접 호출하면 해당 함수가 호출된다.
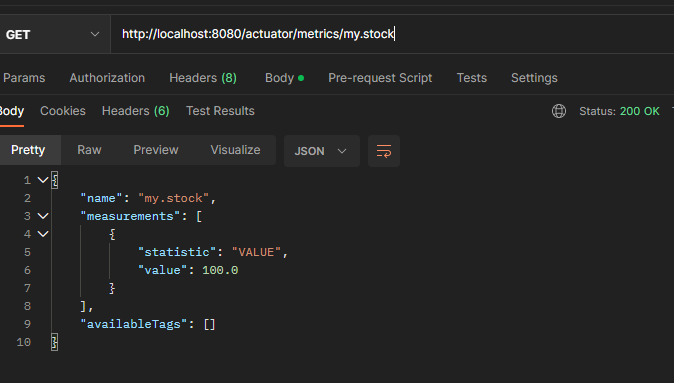
액츄에이터 메트릭 확인
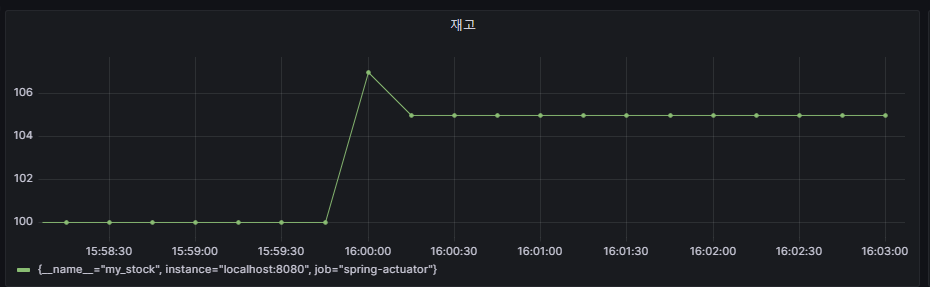
그라파나 등록 - 재고
- 패널 옵션 - Title : 재고
- PromQL : my_stock
StockConfigV2 - 게이지 단순하게 등록하기
StockConfigV2
MeterBinder타입으로 바로 반환해도 된다.
package hello.order.gauge;

import hello.order.OrderService;
import io.micrometer.core.instrument.Gauge;
import io.micrometer.core.instrument.MeterRegistry;
import io.micrometer.core.instrument.binder.MeterBinder;
import jakarta.annotation.PostConstruct;
import lombok.extern.slf4j.Slf4j;
import org.springframework.context.annotation.Bean;
import org.springframework.context.annotation.Configuration;

@Slf4j
@Configuration
public class StockConfigV2 {

    @Bean
    public MeterBinder stockSize(OrderService orderService){
        return registry -> Gauge.builder("my.stock", orderService, service -> {
            log.info("stock gauge call");
            return service.getStock().get();
        }).register(registry);
    }
}
- 실행 결과는 똑같다.
정리
메트릭은 100% 정확한 숫자를 보는데 사용하는 것이 아니다. 약간의 오차를 감안하고 실시간으로 대략의 데이터를 보는 목적으로 사용한다.
실무 모니터링 환경 구성 팁
모니터링 3단계 : 대시보드, 애플리케이션 추적 - 핀포인트, 로그
대시보드 : 전체를 한눈에 볼 수 있는 가장 높은 뷰(마이크로미터, 프로메테우스, 그라파나 등등)
- 시스템 메트릭(CPU, 메모리)
- 애플리케이션 메트릭(톰캣 쓰레드 풀, DB 커넥션 풀, 애플리케이션 호출 수)
- 비즈니스 메트릭(주문수, 취소수)
애플리케이션 추적 : 주로 각각의 HTTP 요청을 추적, 일부는 마이크로서비스 환경에서 분산 추적
- 핀포인트(오픈소스), 스카우트(오픈소스), 와탭(상용), 제니퍼(상용)
로그 : 가장 자세한 추적
- 원하는데로 커스텀 가능 같은 HTTP 요청을 묶어서 확인할 수 있는 방법이 중요
- MDC 적용
알람은 2가지 종류로 꼭 구분해서 관리 (경고, 심각)
- 경고는 하루 1번 정도 사람이 직접 확인해도 되는 수준(사람이 들어가서 확인) 심각은 즉시 확인해야 함,
- 슬랙 알림(앱을 통해 알림을 받도록), 문자, 전화


댓글남기기