- [Practical Testing] Section 2. 단위 테스트
- [Practical Testing] Section 3. TDD
- [Practical Testing] Section 4. 테스트는 [ ] 다
- [Practical Testing] Section 5-1. Spring & JPA 기반 테스트
- [Practical Testing] Section 5-2. Spring & JPA 기반 테스트
- [Practical Testing] Section 6. Mock 을 마주하는 자세
- [Practical Testing] Section 7. 더 나은 테스트를 위한 구체적 조언
- [Practical Testing] Section 8. Spring Rest Docs
[Practical Testing] Section 8. Spring Rest Docs
Spring REST Docs
![]() 테스트 코드를 통한 API 문서 자동화 도구입니다.
테스트 코드를 통한 API 문서 자동화 도구입니다.
![]() API 명세를 문서로 만들고 외부에 제공함으로써 협업을 원활하게 합니다.
API 명세를 문서로 만들고 외부에 제공함으로써 협업을 원활하게 합니다.
![]() 기본적으로 AsciiDoc 을 사용하여 문서를 작성합니다.
기본적으로 AsciiDoc 을 사용하여 문서를 작성합니다.
REST Docs VS. Swagger
REST Docs
- 장점
- 테스트를 통과해야 문서가 만들어집니다. (신뢰도가 높습니다.)
- 프로덕션 코드에 비침투적입니다.
- 단점
- 코드 양이 많습니다.
- 설정이 어렵습니다.
Swagger
- 장점
- 적용이 쉽습니다.
- 문서에서 바로 API 호출을 수행해볼 수 있습니다.
- 단점
- 프로덕션 코드에 침투적입니다.
- 테스트와 무관하기 때문에 신뢰도가 떨어질 수 있습니다.
Rest Docs build.gradle 설정
plugins {
    id 'java'
    id 'org.springframework.boot' version '2.7.13'
    id 'io.spring.dependency-management' version '1.0.15.RELEASE'
    id 'org.asciidoctor.jvm.convert' version '3.3.2' //plugins 추가
}

...

configurations {
    compileOnly {
        extendsFrom annotationProcessor
    }
    asciidoctorExt //configurations 에 추가
}

...

dependencies {
    ...

    // RestDocs
    asciidoctorExt 'org.springframework.restdocs:spring-restdocs-asciidoctor'
    testImplementation 'org.springframework.restdocs:spring-restdocs-mockmvc'

}

tasks.named('test') {
    useJUnitPlatform()
}

ext { // 전역 변수로 저장위치 설정
    snippetsDir = file('build/generated-snippets')
}

test { //테스트가 끝난 결과물을 snippetsDir 에 저장합니다.
    outputs.dir snippetsDir
}

asciidoctor { //문서를 생성하는 asciidoctor 입니다.
    inputs.dir snippetsDir
    configurations 'asciidoctorExt'

    sources { // 특정 파일만 html로 만든다.
        include("**/index.adoc")
    }
    baseDirFollowsSourceFile() // 다른 adoc 파일을 include 할 때 경로를 baseDir로 맞춘다.

    dependsOn test // 작업순서, test가 끝나고 asciidoctor를 실행한다.
}

bootJar { //jar 를 만드는 파일, 문서가 나오면 정적파일로 보기 위해서 static/docs 에 넣어준다.
    dependsOn asciidoctor // 작업순서, asciidoctor가 끝나고 bootJar를 실행한다.
    from("${asciidoctor.outputDir}") {
        into 'static/docs'
    }
}
주석 참고하시면 됩니다.
RestDocsSupport
ControllerTest 가 상속받을 추상 클래스입니다.
@ExtendWith({RestDocumentationExtension.class, MockitoExtension.class}) //1
public abstract class RestDocsSupport {

    protected MockMvc mockMvc; //2

    protected ObjectMapper objectMapper = new ObjectMapper(); //3

    @BeforeEach
    void setUp(RestDocumentationContextProvider provider) { //4

        this.mockMvc = MockMvcBuilders.standaloneSetup(initController()) //5
                .apply(documentationConfiguration(provider)) //6
                .build();
    }

    protected abstract Object initController(); //7
}
주석 순서에 따라 설명하겠습니다.
- RestDocs 를 사용하기 위해 설정해줘야 하는 파일입니다. 강의에서는 ` MockitoExtension.class
는 없었지만@Mock` 어노테이션을 사용하려고 제가 임의로 추가했습니다. - mockMvc 를 사용합니다. Spring 을 띄우지 않습니다.
- objectMapper 도 마찬가지로 주입이 안되기 때문에 인스턴스를 생성합니다.
-
RestDocumentationContextProvider를 주입받습니다. 마찬가지로 restdocs 를 생성하기 위한 클래스입니다. -
standaloneSetup()메서드의 인자값으로initController()를 줍니다. 각 컨트롤러테스트마다 필요한 컨트롤러를 주입합니다.webAppContextSetup()도 사용할 수 있는데 해당 메서드는 스프링 부트 자체를 띄웁니다.(@SpringbootTest) 해당 내용은 아래에서 설명하겠습니다. - Spring REST Docs 설정을 제공하는데 사용됩니다. 이 설정은 API 문서 생성에 필요한 세부 정보를 포함합니다.
- 하위 구현 클래스에서
initController()를 구현합니다. 어떤 컨트롤러를 사용할지 지정합니다.
webAppContextSetup
@ExtendWith({RestDocumentationExtension.class})
@SpringBootTest
public abstract class RestDocsSupport {

@BeforeEach
void setUp(WebApplicationContext webApplicationContext,
            RestDocumentationContextProvider provider) {
    this.mockMvc = MockMvcBuilders.webAppContextSetup(webApplicationContext) //스프링의 컨텍스트, @SpringBootTest 를 넣어줘야 함
            .apply(documentationConfiguration(provider))
            .build();
}
webAppContextSetup() 메서드를 사용하면 setUp 에서 WebApplicationContext 를 넣어줘야합니다. 그리고 해당 메서드에서 webApplicationContext 를 인자로 받습니다. WebApplicationContext 는 스프링의 컨텍스트입니다. @SpringBootTest 를 실행하기 때문에 넣어주는 겁니다. 하지만 API 문서작성에 SpringBoot 를 띄울 필요가 없기 때문에 standaloneSetup() 메서드로 사용하겠습니다.
ProductControllerTest
실제 RestDocs 를 작성하는 컨트롤러 테스트입니다. 스프링을 사용하지 않고 Mock 객체를 사용합니다.
public class ProductControllerTest extends RestDocsSupport {

    @Mock ProductService productService;

    @Override
    protected Object initController() {
        return new ProductController(productService);
    }

    @Test
    @DisplayName("신규 상품을 등록하는 API")
    void createProduct() throws Exception {
        ProductCreateRequest request = ProductCreateRequest.builder()
                .type(HANDMADE)
                .sellingStatus(SELLING)
                .name("아메리카노")
                .price(4000)
                .build();

        given(productService.createProduct(any(ProductCreateServiceRequest.class)))
                .willReturn(ProductResponse.builder()
                        .id(1L)
                        .type(HANDMADE)
                        .productNumber("001")
                        .sellingStatus(SELLING)
                        .name("아메리카노")
                        .price(4000)
                        .build());

        mockMvc.perform(post("/api/v1/products/new")
                .content(objectMapper.writeValueAsString(request))
                .contentType(MediaType.APPLICATION_JSON)
        )
                .andDo(print())
                .andExpect(status().isOk())
                .andDo(document("product-create",
                        requestFields(
                                fieldWithPath("type").type(JsonFieldType.STRING)
                            .description("상품 타입"),
                                fieldWithPath("sellingStatus").type(JsonFieldType.STRING)
                            .description("상품 판매상태"),
                                fieldWithPath("name").type(JsonFieldType.STRING)
                            .description("상품 이름"),
                                fieldWithPath("price").type(JsonFieldType.NUMBER)
                            .description("상품 가격")
                        ),
                        responseFields(
                                fieldWithPath("code").type(JsonFieldType.NUMBER)
                            .description("코드"),
                                fieldWithPath("status").type(JsonFieldType.STRING)
                            .description("상태"),
                                fieldWithPath("message").type(JsonFieldType.STRING)
                            .description("메세지"),
                                fieldWithPath("data").type(JsonFieldType.OBJECT)
                            .description("응답 데이터"),
                                fieldWithPath("data.id").type(JsonFieldType.NUMBER)
                            .description("상품 ID"),
                                fieldWithPath("data.productNumber").type(JsonFieldType.STRING)
                            .description("상품 번호"),
                                fieldWithPath("data.type").type(JsonFieldType.STRING)
                            .description("상품 타입"),
                                fieldWithPath("data.sellingStatus").type(JsonFieldType.STRING)
                            .description("상품 판매상태"),
                                fieldWithPath("data.name").type(JsonFieldType.STRING)
                            .description("상품 이름"),
                                fieldWithPath("data.price").type(JsonFieldType.NUMBER)
                            .description("상품 가격")
                        )
                ));
    }
}
기본적으로 성공하는 BDD 와 똑같습니다. andDo(document(...) 여기부터 달라집니다.
andDo(document(...)) 에서 첫번째 파라미터는 식별자 이름입니다. 아무거나 지정해도 됩니다. 두번째 파라미터부터는 Snippets 클래스입니다. requestFields() 와 responseFields() 모두 Snippets 입니다. 해당 메서드 안에 fieldWithPath("파라미터 이름").type("파라미터 타입").description("설명") 을 넣어줍니다.
테스트 실행, adoc 파일 생성
테스트를 실행하면 build 디렉토리에 아래와 같이 생깁니다.
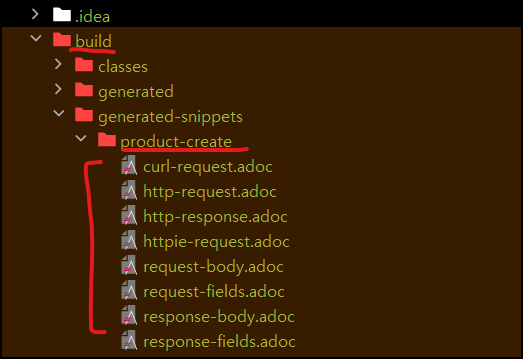
아까 build.gradle 파일에 file('build/generated-snippets') 여기에 저장하라고 설정했었는데요. 잘 저장되었습니다. 디렉토리 이름은 설정한 product-create 가 되었습니다.
이번에는 adoc 파일을 작성하겠습니다. 해당 파일은 기본적으로 src/docs/asciidoc 에서 작성해야 합니다. 해당 위치에 index.adoc 을 생성합니다.

ifndef::snippets[]
//경로 지정
:snippets: ../../build/generated-snippets
endif::[]
= CafeKiosk REST API 문서
:doctype: book
:icons: font
:source-highlighter: highlightjs
:toc: left
:toclevels: 2
:sectlinks:

[[product-create]]
=== 신규 상품 등록

==== HTTP Request
include::{snippets}/product-create/http-request.adoc[]
include::{snippets}/product-create/request-fields.adoc[]

==== HTTP Response
include::{snippets}/product-create/http-response.adoc[]
include::{snippets}/product-create/response-fields.adoc[]
-
:doctype: book: Asciidoc 문서의 타입을 ‘book’ 으로 설정합니다. 이는 문서가 여러 장(chapter)으로 구성될 것임을 의미합니다. -
:icons: font: 이 설정은 Asciidoc 문서에서 아이콘을 폰트 기반으로 사용하도록 설정합니다. 즉, 아이콘을 표시할 때 이미지 대신 폰트를 사용하게 됩니다. -
:source-highlighter: highlightjs: 이 설정은 소스 코드 블록의 문법 하이라이팅에highlight.js를 사용하도록 설정합니다.highlight.js는 웹에서 소스 코드의 문법을 하이라이팅하는 데 사용되는 JavaScript 라이브러리입니다. -
:toc: left: 이 설정은 TOC 가 문서의 왼쪽에 위치하도록 설정합니다. -
:toclevels: 2: TOC 레벨을 설정합니다. -
:sectlinks:: 이 설정은 섹션 제목을 클릭하면 해당 섹션으로 이동하는 링크가 생성되도록 합니다. 이를 통해 문서 내의 특정 섹션으로 쉽게 이동할 수 있게 됩니다. -
[[product-create]]는 Asciidoc 문서 내에서 앵커를 정의하는 방법입니다.[[product-create]]라는 앵커를 선언함으로써, 이 위치로 직접 링크를 생성하거나 이동할 수 있게 됩니다. 예를 들어, 이 앵커가 선언된 위치로 바로 이동하려면 문서 내에서<<product-create>>와 같은 형식으로 참조할 수 있습니다.
추가적인 속성
:sectnums:: 목차에서 각 섹션에 넘버링합니다.:toc-title:: 목차의 제목을 지정할 수 있습니다.:source-highlighter: prettify: 문서에 표시되는 소스 코드 하일라이터 중 하나입니다.
빌드를 하면 아래의 디렉토리에서 index.html 파일이 생깁니다. (build.gradle 에서 지정해뒀던 곳입니다.)
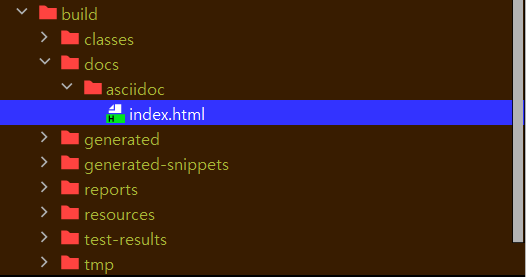
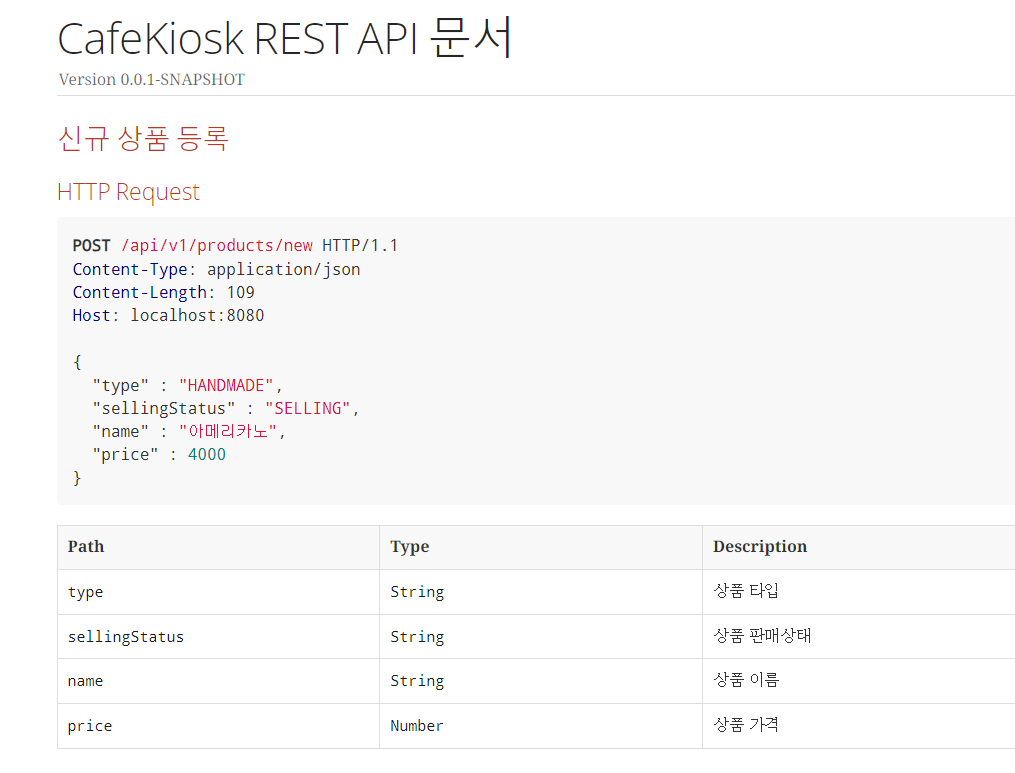
그리고 아래와 같이 문서를 열 수 있습니다.
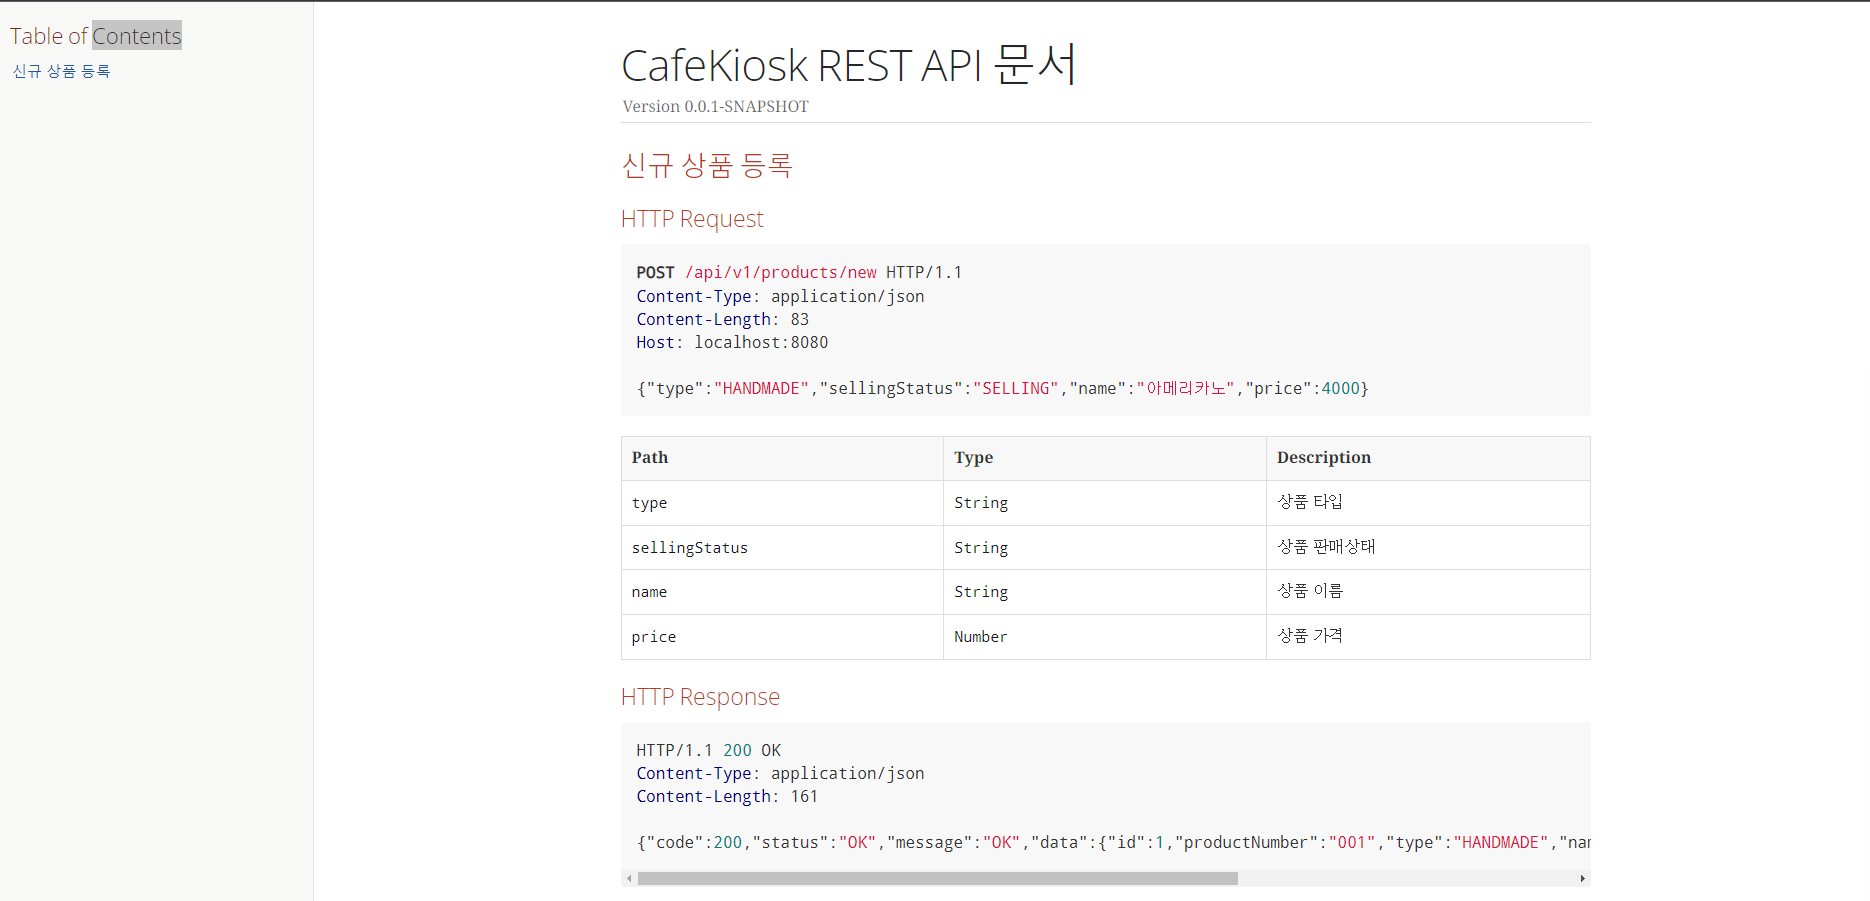
PrettyPrint()
위 문서를 보면 Json 양식이 보기 불편하게 나오는데요. 이를 해결하기 위해 PrettyPrint() 를 사용해보겠습니다.
 mockMvc.perform(post("/api/v1/products/new")
                .content(objectMapper.writeValueAsString(request))
                .contentType(MediaType.APPLICATION_JSON)
        )
                .andDo(print())
                .andExpect(status().isOk())
                .andDo(document("product-create",
                        preprocessRequest(prettyPrint()), //추가
                        preprocessResponse(prettyPrint()), //추가
                        requestFields(...),
                        responseFields(...)
해당 파라미터는 아래와 같이 OperationRequestPreprocessor 와 OperationResponsePreprocessor 입니다.

하지만 이렇게 쓰면 모든 클래스에 중복으로 사용되겠죠. 제가 임의로 추출해서 RestDocsSupport 클래스에 적용시켰습니다.
public abstract class RestDocsSupport {

    protected MockMvc mockMvc;

    protected ObjectMapper objectMapper = new ObjectMapper();

    protected RestDocumentationResultHandler documentHandler //1


    @BeforeEach
    void setUp(RestDocumentationContextProvider provider, TestInfo testInfo) {

        String className = testInfo.getTestClass().orElseThrow().getSimpleName().replace("ControllerTest", ""); //1
        String methodName = testInfo.getTestMethod().orElseThrow().getName(); //2

         documentHandler = document( //3
                className + "-" + methodName,
                preprocessRequest(prettyPrint()),
                preprocessResponse(prettyPrint())
        );

        this.mockMvc = MockMvcBuilders.standaloneSetup(initController())
                .apply(documentationConfiguration(provider))
                .alwaysDo(documentHandler) //4
                .build();
    }

    protected abstract Object initController();
}
주석 순서대로 적겠습니다.
-
RestDocumentationResultHandler는 테스트에서 항상 적용시킬ResultHandler입니다. 구현 클래스에서도 사용할 수 있도록 필드로 선언합니다. -
identifier로 사용할className입니다. 예를 들어ProductControllerTest는product가 됩니다. -
identifier로 사용할methodName입니다. 예를 들어create()는create가 됩니다. -
공통으로 적용될 로직을 작성합니다.
.andDo(...)에서identifier,OperationRequestPreprocessor,OperationResponsePreprocessor를 미리 적용합니다.-
"-"대신 ` “/”이라고 적으면 디렉토리가 계층형 구조를 가지게 됩니다. (product/create`)
-
- 모든 테스트에
documentHandler를 적용시킵니다.
이제 ControllerTest 를 살짝 고치겠습니다.
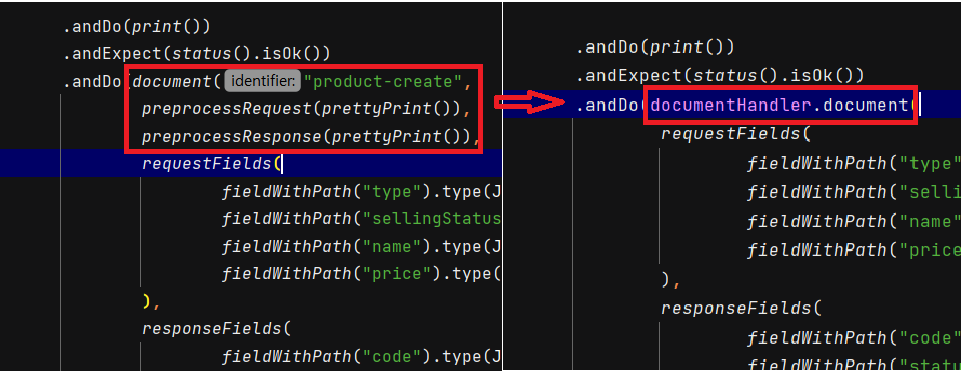
코드의 중복이 줄어들었습니다. Controller 에서는 부모 클래스의 documentHandler.document() 만 호출해서 정의된 공통 로직이외의 Snippets 만 적으면 됩니다.
이제 빌드를 해서 실행하면 Json 이 잘 적용된 걸 알 수 있습니다.
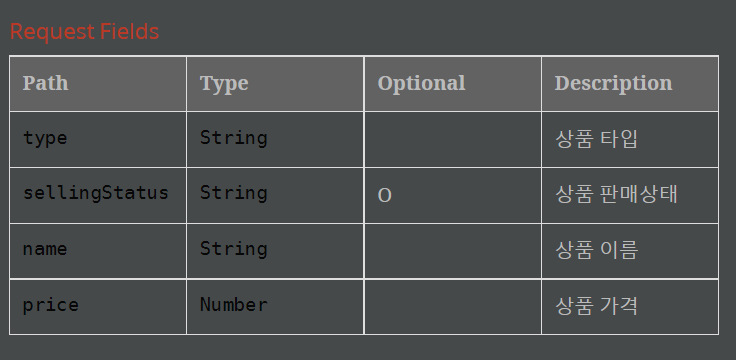
Optional 추가, custom snippet 사용
해당 값이 없어도 되는지 optional 을 테이블에 추가해서 알려주도록 하겠습니다. 이를 위해서는 출력되는 테이블에 Optional 필드를 추가해야 합니다.
test 디렉토리의 resources/org/springframework/restdocs/templates 에 .snippet 파일을 커스텀으로 추가하면 해당 파일을 읽어서 adoc 으로 등록합니다.
아래는 해당 위치의 request-Fields.snippet 과 response-Fields.snippet 파일입니다.
==== Request Fields
|===
|Path|Type|Optional|Description


|`++`
|`++`
|O
|


|===
==== Response Fields
|===
|Path|Type|Optional|Description


|`++`
|`++`
|O
|


|===
중간에 |O 이 있습니다. Optional 이면 O 를 표시한다는 뜻입니다.
이제 ControllerTest 에 Optional() 을 추가합니다.
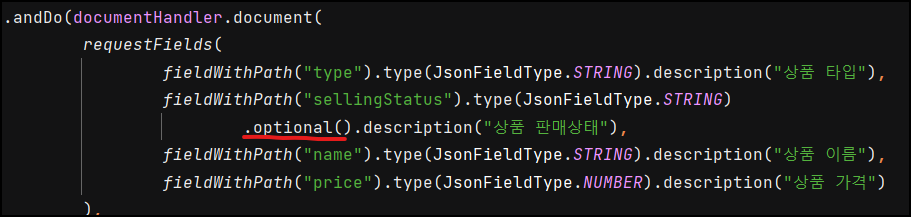
이제 다시 테스트를 실행해서 .adoc 파일을 보면 Optional 이 잘 들어와있습니다.
.adoc 파일 분리 (index.adoc 리팩토링)
이번엔 index.adoc 에 대한 리팩토링을 해보겠습니다. 현재 index.adoc 상태입니다.
ifndef::snippets[]
:snippets: ../../build/generated-snippets
endif::[]
= CafeKiosk REST API 문서
:doctype: book
:icons: font
:source-highlighter: highlightjs
:toc: left
:toclevels: 2
:sectlinks:

[[Product-API]]
== Product API
[[product-create]]
=== 신규 상품 등록

==== HTTP Request
include::{snippets}/product-create/http-request.adoc[]
include::{snippets}/product-create/request-fields.adoc[]

==== HTTP Response
include::{snippets}/product-create/http-response.adoc[]
include::{snippets}/product-create/response-fields.adoc[]
지금은 괜찮지만, 모든 API 가 한 문서에 담긴다면 작성도 힘들고, 유지보수도 안될겁니다. 따라서 각 API 별로 따로 파일을 빼주고 해당 파일을 사용하는 방식으로 하겠습니다.
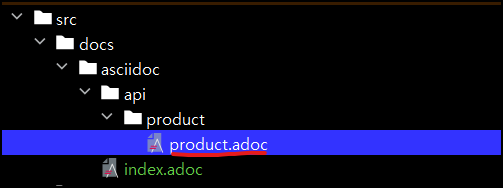
product-create 를 뺴서 product.adoc 이라는 파일을 만듭니다.
[[product-create]]
=== 신규 상품 등록

==== HTTP Request
include::{snippets}/product-create/http-request.adoc[]
include::{snippets}/product-create/request-fields.adoc[]

==== HTTP Response
include::{snippets}/product-create/http-response.adoc[]
include::{snippets}/product-create/response-fields.adoc[]
그리고 index.adoc 은 아래와 같이 리팩토링합니다. 경로를 통해 product.adoc[] 을 찾습니다.
= CafeKiosk REST API 문서
:doctype: book
:icons: font
:source-highlighter: highlightjs
:toc: left
:toclevels: 2
//섹션에 대한 링크
:sectlinks:

[[Product-API]]
== Product API
include::api/product/product.adoc[]
하지만 http 문서에서는 잘 동작하지 않을건데요. 이는 build.gradle 에 아래 옵션을 추가하지 않았기 때문입니다.
asciidoctor {
    inputs.dir snippetsDir
    configurations 'asciidoctorExt'

    sources { // 특정 파일만 html로 만든다.
        include("**/index.adoc")
    }
    baseDirFollowsSourceFile() // 다른 adoc 파일을 include 할 때 경로를 baseDir로 맞춘다.

    dependsOn test
}
baseDirFollowsSourceFile() 통해 include 시 위치 경로를 맞춰줍니다. 그리고 product.html 은 필요없으니 생기지 않도록 sources {include("**/index.adoc")} 를 선언합니다.
다시 빌드를 하면 리팩토링 이후에도 잘 동작함을 알 수 있습니다.
배포
build.gradle 에서 설정한 내용대로 호출하면 됩니다. 아래는 gradle 파일 일부입니다.
bootJar { //jar 를 만드는 파일, 문서가 나오면 정적파일로 보기 위해서 static/docs 에 넣어준다.
    dependsOn asciidoctor
    from("${asciidoctor.outputDir}") {
        into 'static/docs'
    }
}
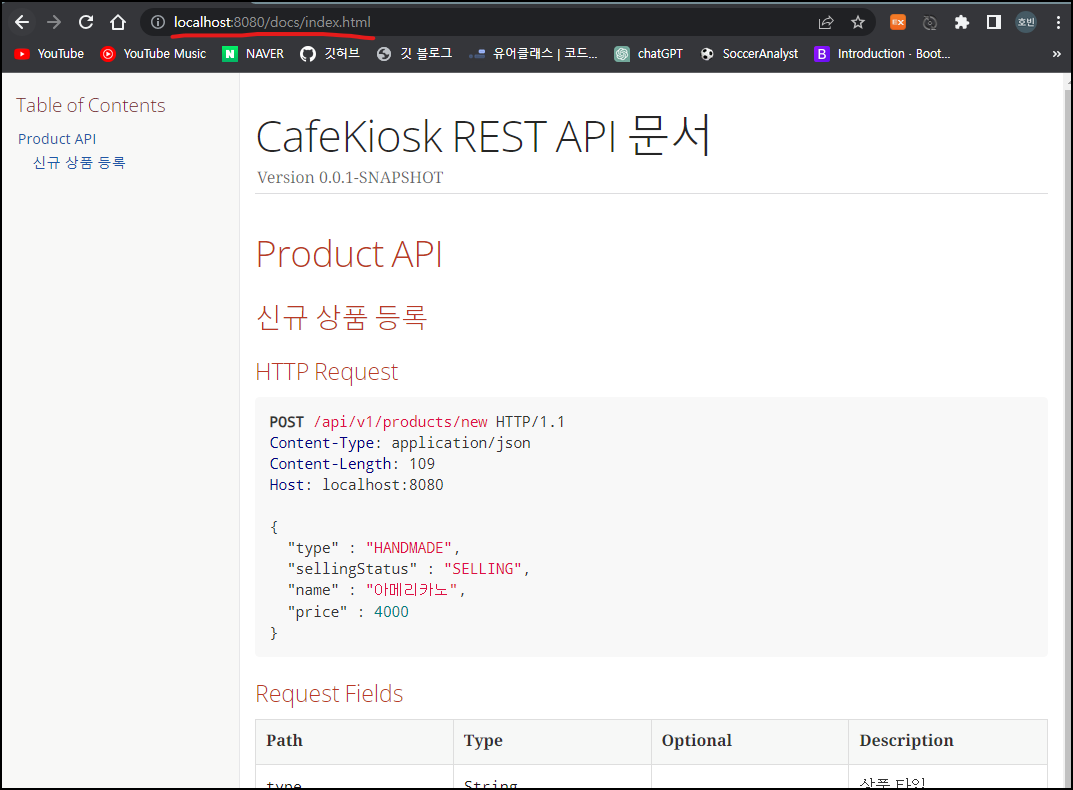
jar 파일의 docs 에 접근하면 index.html 을 볼 수 있습니다.
터미널에서 실행 후 localhost:8080/docs/index.html 로 접속
추가 내용
국비 교육을 진행하면서 추가적으로 공부한 내용입니다.
ControllerTest 와 RestDocs 함께 작성
Controller 를 테스트하면서 동시에 RestDocs 를 작성할 수도 있습니다.
@WebMvcTest(MemberController.class)
@MockBean(JpaMetamodelMappingContext.class)   // (1)
//@AutoConfigureMockMvc //WebMvcTest 에 있기 때문에 필요없음
@ExtendWith({RestDocumentationExtension.class})
public class MemberControllerRestDocsTest {
    @Autowired
    private MockMvc mockMvc;

    @MockBean
	  // (3) 테스트 대상 Controller 클래스가 의존하는 객체를 Mock Bean 객체로 주입받기

    @Test
    public void postMemberTest() throws Exception {
        // given
        // stubbing

        // when
        ResultActions actions =
                mockMvc.perform(
                     // request 전송
                );

        // then
        actions
                .andExpect(// (response에 대한 기대 값 검증)
                .andDo(document(
                            // API 문서 스펙 정보 추가
                 ));
    }
}
-
@EnableJpaAuditing을 xxxxxxApplication 클래스에 추가하게 되면 JPA와 관련된 Bean 을 필요로 하기 때문에@WebMvcTest애너테이션을 사용해서 테스트를 진행할 경우에는JpaMetamodelMappingContext를 Mock 객체로 주입해 주어야 합니다. - Spring Rest Docs에 대한 자동 구성을 위해
@AutoConfigureRestDocs를 추가해 줍니다. - Controller 클래스가 의존하는 객체(주로 서비스 클래스, Mapper)의 의존성을 제거하기 위해
@MockBean어노테이션을 사용해서 Mock 객체를 주입받습니다.
adoc Index 박스 문단 사용 및 경고 문구
index.adoc 에 다음과 같이 박스 문단과 경고 문구를 추가할 수 있습니다.
***
API 문서 개요

 이 문서는 45기 백엔드 수강생들과 Spring MVC 기반의 REST API 기반 애플리케이션에 대해 직접 학습하며 만들어 가는 샘플 애플리케이션입니다.
 샘플 애플리케이션을 사용해보고자 하는 분들은 이 문서를 통해 API의 구체적인 사용법을 알 수 있습니다.

CAUTION: 이 문서는 학습용으로 일부 기능에 제한이 있습니다. 기능 제한 사항에 대해 알고 싶다면 담당자에게 문의 하세요

***

CAUTION 이외에도 NOTE: , TIP: , IMPORTANT: , WARNING: 등을 사용할 수 있습니다.
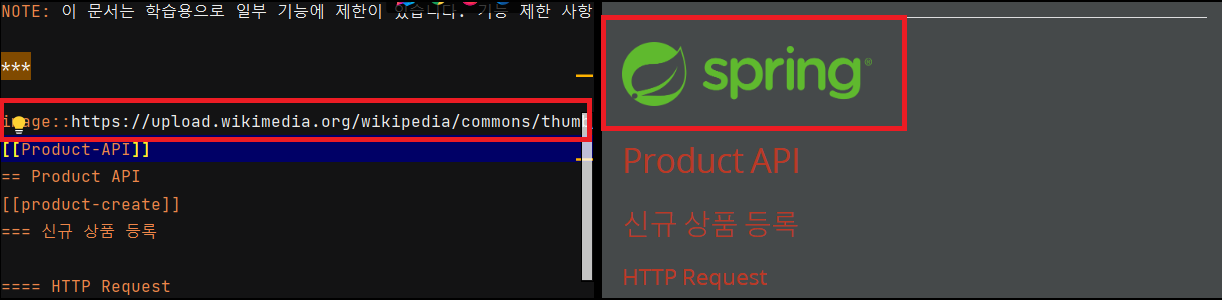
이미지 추가
image::img url[image name, width, heigth] 를 지정할 수 있습니다.
예시 : image::https://upload.wikimedia.org/wikipedia/commons/thumb/4/44/Spring_Framework_Logo_2018.svg/1280px-Spring_Framework_Logo_2018.svg.png[spring-logo, 200, 200]
PathVariable, QueryParameter 추가
각각 pathParameters, queryParameters 를 사용합니다.
mockMvc.perform(
    post("/post/{postId}/{subPath}", postId, "exampleSubPath")
        .param("query1", "value1")
        .param("query2", "value2")
        .contentType(MediaType.APPLICATION_JSON))
    .andExpect(status().isCreated())
    .andDo(documentHandler.document(
        pathParameters(
            parameterWithName("postId").description("The ID of the post"),
            parameterWithName("subPath").description("The subpath")
        ),
        queryParameters(
            parameterWithName("query1").description("The first query parameter"),
            parameterWithName("query2").description("The second query parameter")
        )
    ));
Header 값 검증
andExpect 를 이용해 header 값을 검증하는 방법입니다.
 mockMvc.perform(
                        patch("/posts/{postId}", post.getId())
                                .contentType(APPLICATION_JSON)
                                .accept(APPLICATION_JSON)
                                .content(objectMapper.writeValueAsString(requestDto))
                )
                .andDo(print())
                .andExpect(status().isOk())
                .andExpect(header().string("Location", is(endsWith("/posts/" + post.getId()))));
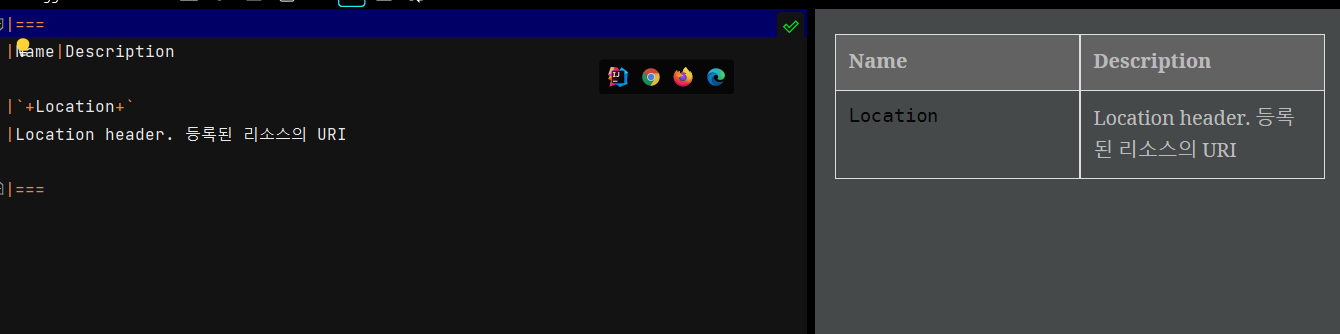
Header 값 문서에 추가
Create 를 할 때 반환되는 reponse 의 Header 값도 문서에 포함할 필요가 있습니다.
.andDo(documentHandler.document(
    responseHeaders(
    	headerWithName(HttpHeaders.LOCATION).description("Location header. 등록된 리소스의 URI")
    )
));
이런 식으로 등록할 수 있습니다. 아래와 같이 response-headers.adoc 파일이 생깁니다.
ControllerTestHelper 추가
get, post, patch, delete 등 자주 사용하는 형식을 메서드로 정의해놓을 수도 있습니다. 먼저 기본적인 ControllerTestHelper 입니다.
public interface ControllerTestHelper<T> {
    default RequestBuilder postRequestBuilder(URI uri,
                                              String content) {
        return MockMvcRequestBuilders
                .post(uri)
                .accept(MediaType.APPLICATION_JSON)
                .contentType(MediaType.APPLICATION_JSON)
                .content(content);
    }

    default RequestBuilder patchRequestBuilder(String uri,
                                               String content) {
        return MockMvcRequestBuilders
                .patch(uri)
                .accept(MediaType.APPLICATION_JSON)
                .contentType(MediaType.APPLICATION_JSON)
                .content(content);

    }

    default RequestBuilder getRequestBuilder(String uri) {
        return MockMvcRequestBuilders
                .get(uri)
                .accept(MediaType.APPLICATION_JSON);
    }

    default RequestBuilder getRequestBuilder(URI uri, MultiValueMap<String, String> queryParams) {
        return MockMvcRequestBuilders
                .get(uri)
                .params(
                        queryParams
                )
                .accept(MediaType.APPLICATION_JSON);
    }

    default RequestBuilder deleteRequestBuilder(String uri) {
        return MockMvcRequestBuilders.delete(uri);
    }

    default URI createURI(String url) {
        return UriComponentsBuilder.newInstance().path(url).build().toUri();
    }

    default URI createURI(String url, long resourceId) {
        return UriComponentsBuilder.newInstance().path(url).buildAndExpand(resourceId).toUri();
    }

    default String toJsonContent(T t) {
        Gson gson = new Gson();
        String content = gson.toJson(t);
        return content;
    }
}
만약 RestDocs 를 사용하려면 return 에서 MockMvcRequestBuilders 대신 RestDocumentationRequestBuilders 를 사용하고, MockHttpServletRequestBuilder 를 반환해야 합니다.
예를 들어, 쿼리 파라미터를 받거나 PathVariables 를 받는 메서드는 아래와 같이 구현할 수 있습니다.
default MockHttpServletRequestBuilder getRequestBuilder(String uri, Object... uriVariables) {
    return RestDocumentationRequestBuilders
            .get(uri, uriVariables)
            .accept(MediaType.APPLICATION_JSON);
}

default MockHttpServletRequestBuilder getRequestBuilder(URI uri, MultiValueMap<String, String> queryParams) {
    return RestDocumentationRequestBuilders
            .get(uri)
            .params(
                    queryParams
            )
            .accept(MediaType.APPLICATION_JSON);
}
String uri 와 URI uri 를 구분해주어야 사용할 때 구분되어집니다. MultiValueMap<String, String> 가 들어와도 Object 로 인식되어서, 두번째 getRequestBuilder 가 아닌 첫번째 getRequestBuilder 가 실행되기 때문입니다.
이번엔 MemberControllerTest 에 특화된 MemberControllerTestHelper 입니다.
public interface MemberControllerTestHelper extends ControllerTestHelper {
    String MEMBER_URL = "/v11/members";
    default URI getURI() {
        return createURI(MEMBER_URL);
    }

    default URI getURI(long memberId) {
        return createURI(MEMBER_URL + "/{memberId}", memberId);
    }
}
ControllerTestHelper 를 상속받고 있습니다. 필요한 메서드를 채워넣으면 됩니다.


댓글남기기