- [Spring Security] Section 1. 스프링 시큐리티 기본 API 및 Filter
- [Spring Security] Section 2. 주요 아키텍처 이해
- [Spring Security] Section 3. 인증 프로세스 Form 인증 구현
- [Spring Security] Section 4. Ajax 인증 구현
- [Spring Security] Section 5. 인가 프로세스 DB 연동 웹계층
- [Spring Security] Section 6. Method 기반 DB 연동
[Spring Security] Section 2. 주요 아키텍처 이해
위임 필터 및 필터 빈 초기화
Filter 는 DispatcherServlet 의 앞단에서 일어나는 일로, 서블릿 컨테이너의 통제를 받습니다. 반면 스프링 빈은 스프링 컨테이너에서 주입을 받습니다. 따라서 스프링에서 정의된 빈은 필터로 사용할 수 없는데요. 스프링에서 직접 필터를 등록하고자 하는 요구사항이 늘어나면서 서블릿은 특정한 이름을 가진 스프링 빈을 찾아 그 빈에게 요청을 위임하게 됩니다.
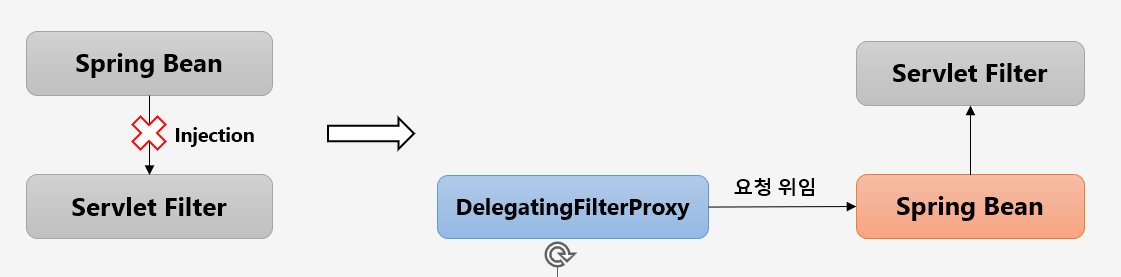
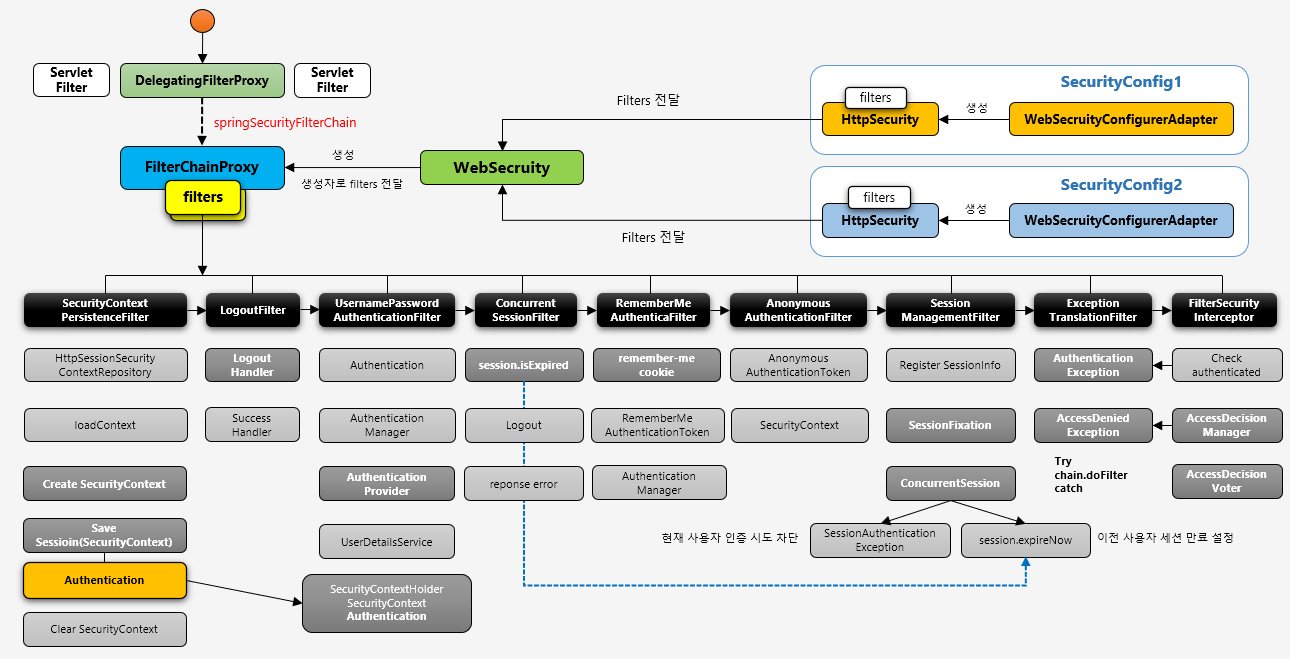
Servlet 은 DelegatingFliterProxy 로 springSecurityFilterChain 이름으로 생성된 빈을 ApplicationContext 에서 찾아 요청을 위임합니다. 실제 보안 처리는 직접 하지 않습니다.
FilterchainProxy

springSecurityFilterChain의 이름으로 생성되는 필터 빈입니다.DelegatingFilterProxy으로 부터 요청을 위임 받고 실제 보안 처리를 합니다.- 스프링 시큐리티 초기화 시 생성되는 필터들을 관리하고 제어합니다.
- 스프링 시큐리티가 기본적으로 생성하는 필터
- 설정 클래스에서 API 추가 시 생성되는 필터
- 사용자의 요청을 필터 순서대로 호출하여 전달합니다.
- 사용자정의 필터를 생성해서 기존의 필터의 전, 후로 추가할 수 있습니다.
- 필터의 순서를 잘 정의해야 합니다.
- 마지막 필터까지 인증 및 인가 예외가 발생하지 않으면 보안에 통과된 것입니다.
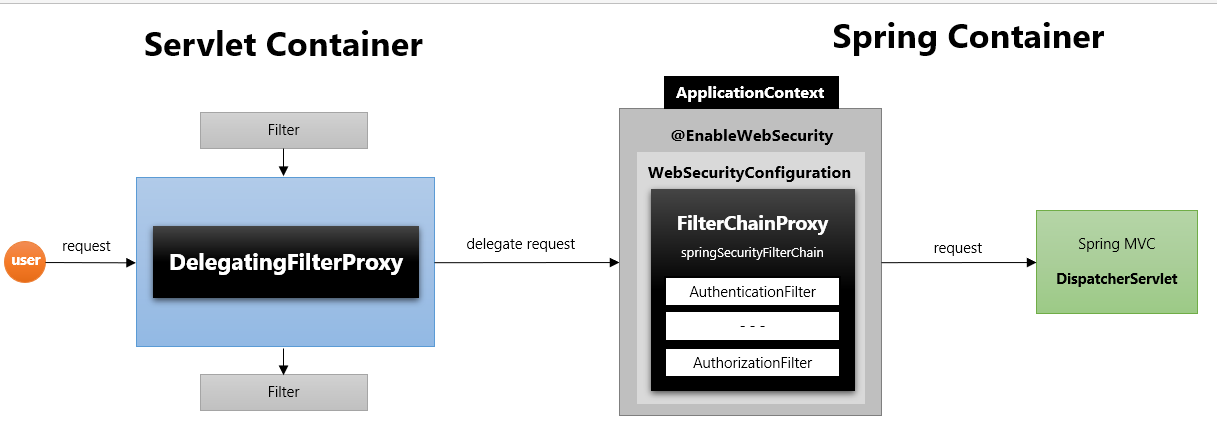
DelegatingFilterProxy 가 등록될 때 targetBean 을 springSecurityFilterChain 으로 지정하게 됩니다. 해당 이름은 FilterChainProxy 의 빈 이름입니다. 이후 사용자의 요청에 대해 각각의 필터들이 처리할 때 DelegatingFilterProxy 차례에서 springSecurityFilterChain 이름으로 등록된 FilterChainProxy 을 호출합니다.
필터 초기화와 다중 보안 설정
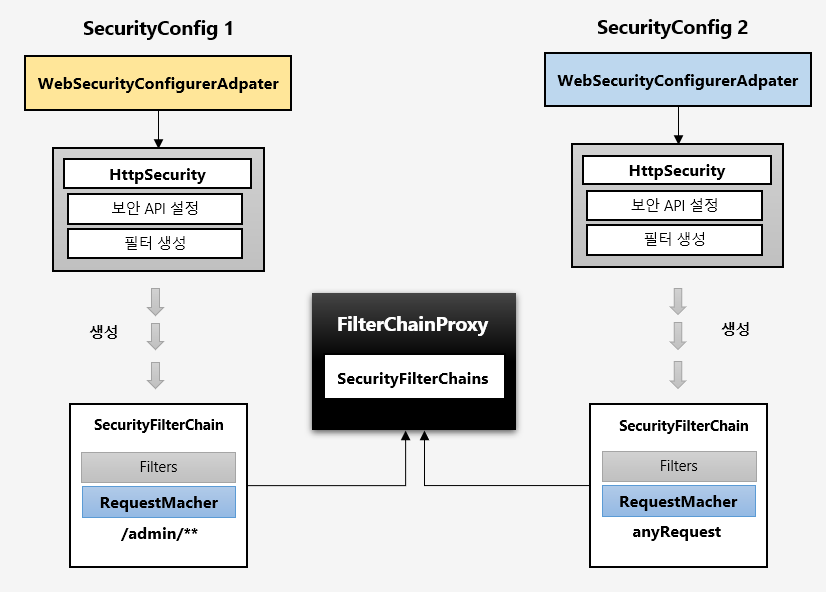
WebSecurityConfigurerAdapter 가 2개 이상이라면 각각의 Filters 가 생성이 되어서 FilterChainProxy 에 등록됩니다.
FilterChainProxy 가 각 필터들 가지고 있으면서 요청에 따라 RequestMatcher 와 매칭되는 필터가 작동하도록 합니다.
코드 레벨
다음과 같이 두 개의 SecurityConfig 를 설정합니다. @Order 를 통해 순서를 지정해줘야 합니다.
@Configuration
@EnableWebSecurity
@Order(0)
public class SecurityConfig extends WebSecurityConfigurerAdapter {

    @Override
    protected void configure(HttpSecurity http) throws Exception {

        http
                .antMatcher("/admin/**")
                .authorizeRequests()
                .anyRequest().authenticated()
                .and()
                .httpBasic();
    }
}

@Configuration
@Order(1)
class SecurityConfig2 extends WebSecurityConfigurerAdapter {

    @Override
    protected void configure(HttpSecurity http) throws Exception {

        http
                .authorizeRequests()
                .anyRequest().permitAll()
                .and()
                .formLogin();
    }
}
스프링을 실행시키면서 WebSecurity 의 performBuild() 메서드를 보겠습니다.
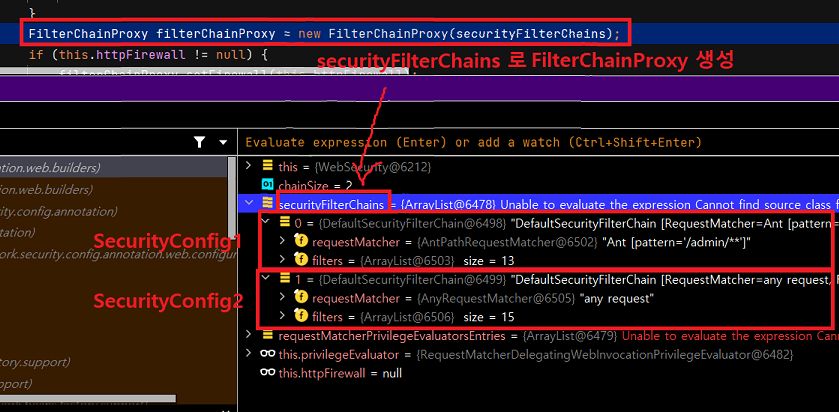
FilterChainProxy 를 생성할 때 SecurityFilterChain 을 리스트 형태로 넘기고 있습니다. 각각 requestMatcher 를 가집니다.
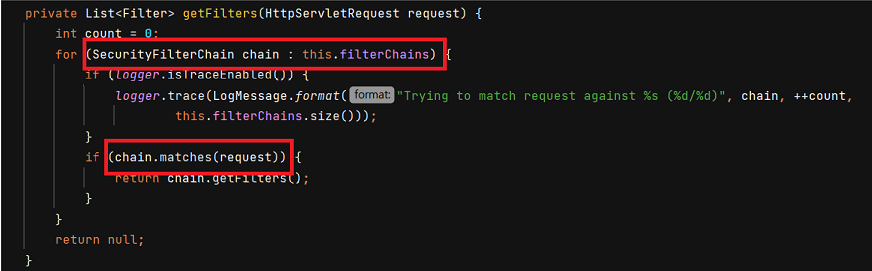
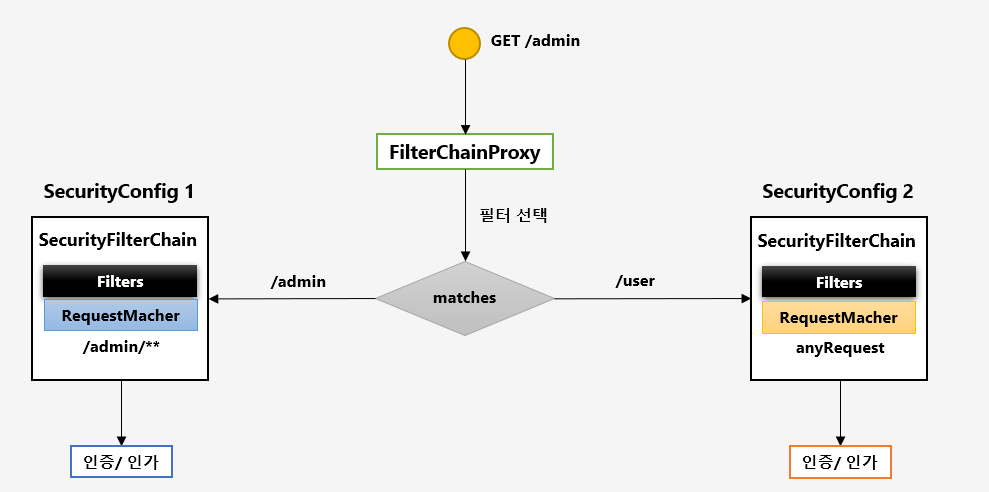
요청이 들어오면 FilterChainProxy 에서 filterChains 를 순회하면서 맞는 필터를 찾습니다. 이때 Order 순서에 따라 순회합니다. 만약 Order 순서가 변경된다면, /admin/** 에도 인증 절차 없이 모든 사용자가 접근 가능해지게 됩니다. SecurityConfig2 가 먼저 적용되기 때문입니다.
인증 개념 이해 - Authentication
인증(Authentication) 은 당신이 누구인지 증명하는 것입니다.
- 사용자의 인증 정보를 저장하는 토큰 개념입니다.
- 인증 시
id와password를 담고 인증 검증을 위해 전달되어 사용됩니다. - 인증 후 최종 인증 결과 (user 객체, 권한정보) 를 담고
SecurityContext에 저장되어 전역적으로 참조가 가능합니다.Authentication authentication = SecurityContexHolder.getContext().getAuthentication()
구조
- principal : 사용자 아이디 혹은 User 객체를 저장
- credentials : 사용자 비밀번호
- authorities : 인증된 사용자의 권한 목록
- details : 인증 부가 정보
- Authenticated : 인증 여부
인증 흐름

먼저 UsernamePasswordAuthenticationFilter 의 attemptAuthentication() 메서드에서 비인증된 UsernamePasswordAuthenticationToken 을 만들고, 인증은 ProviderManager 으로 위임합니다.
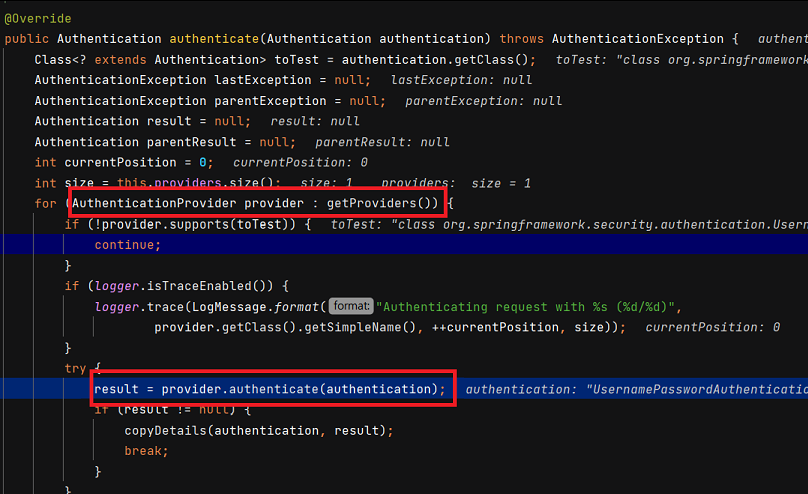
ProviderManager 에서는 저장된 provider 의 authenticate() 메서드로 인증을 넘깁니다.
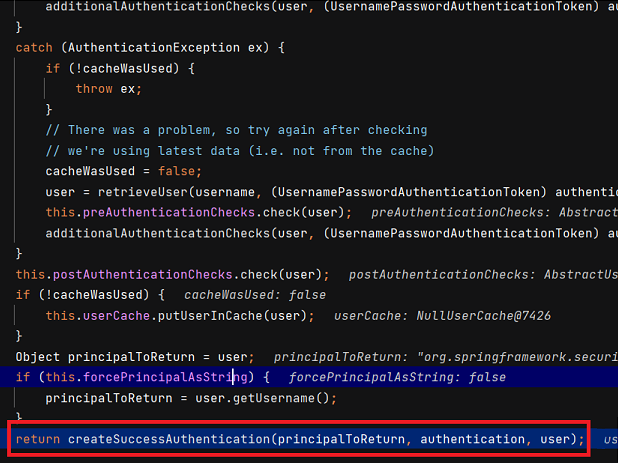
DaoAuthenticationProvider 의 authenticate() 메서드는 길어서 다 캡처하진 못했는데, 인증이 완료되면 createSuccessAuthentication() 메서드를 호출합니다. 해당 메서드는 로직실행 후 부모클래스의 createSuccessAuthentication() 를 호출합니다.
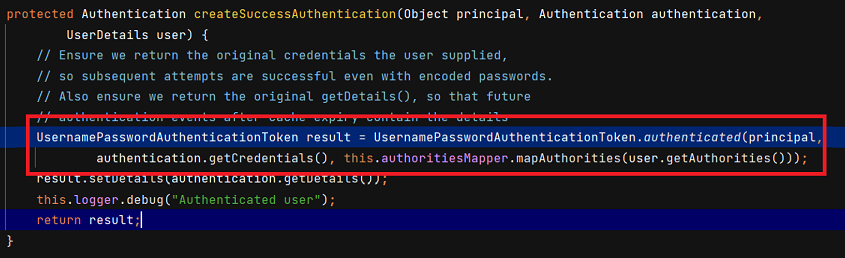
AbstractUserDetailsAuthenticationProvider 는 principal, Credential, Authorities 를 통해 UsernamepasswordAuthenticationToken 을 만듭니다. 그리고 setDetails() 로 부가 정보를 저장합니다.
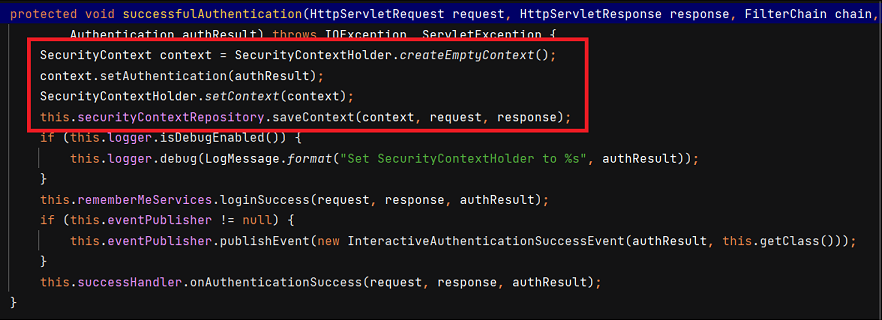
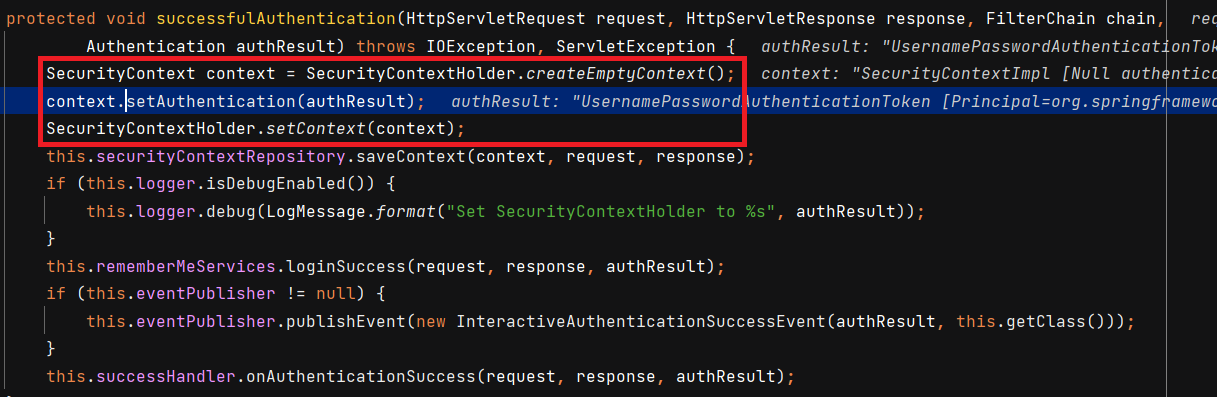
인증이 완료되면 AbstractAuthenticationProcessingFilter 의 successfulAuthentication() 메서드가 호출되어 SecurityContextHolder 에 해당 정보가 저장되게 됩니다. SecurityContextHolder.getContext().getAuthentication() 을 통해 전역적으로 사용할 수 있습니다.
인증저장소 - SecurityContextHolder, SecurityContext
SecurityContext
SecurityContext 는 Authentication 객체가 저장되는 보관소로 필요 시 언제든지 Authentication 객체를 꺼내어 쓸 수 있도록 제공되는 클래스입니다. ThreadLocal (쓰레드별 고유 저장소) 에 저장되어 아무 곳에서나 참조가 가능하도록 설계되었습니다. 인증이 완료되면 HttpSession 에 저장되어 애플리케이션 전반에 걸쳐 전역적인 참조가 가능하게 됩니다.
SecurityContextHolder
SecurityContextHolder 는 SecurityContext 객체를 감싸고 있습니다. SecurityContext 객체 저장 방식은 아래와 같습니다.
- MODE_THREADLOCAL : 스레드당
SecurityContext객체를 할당, 기본값 - MODE_INHERITABLETHREADLOCAL : 메인 스레드와 자식 스레드에 관하여 동일한
SecurityContext를 유지 - MODE_GLOBAL : 응용 프로그램에서
static으로 단 하나의SecurityContext를 저장
SecurityContextHolder.clearContext() 로 SecurityContext 정보를 초기화할 수 있습니다.
Authentication 얻기 : Authentication authentication = SecurityContextHolder.getContext().*getAuthentication()
흐름은 아래와 같습니다.
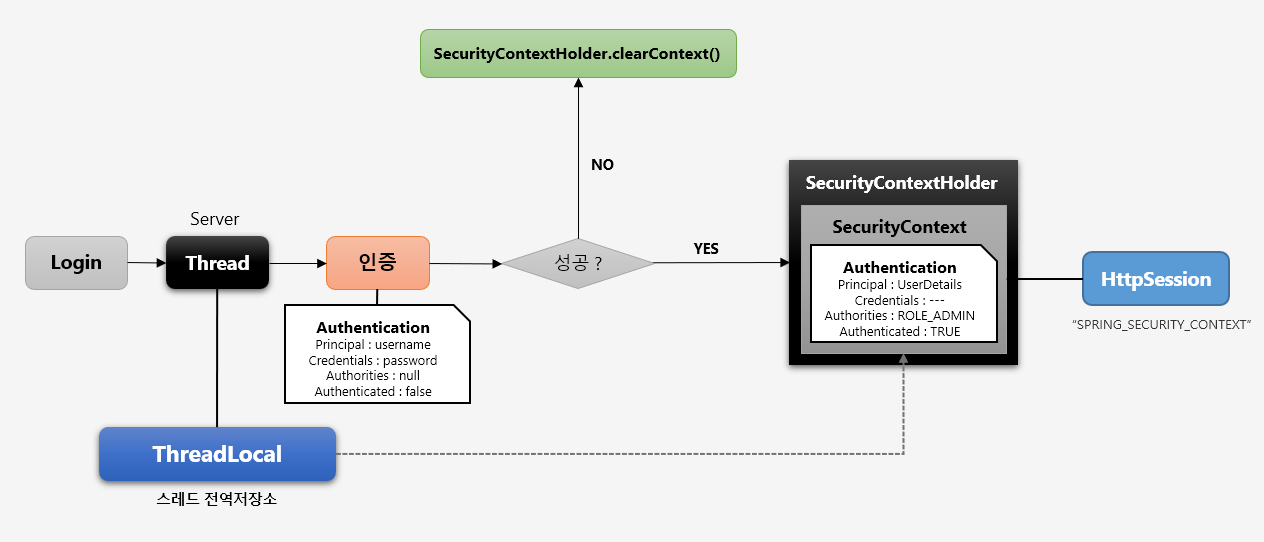
로그인을 시도하면 스레드를 할당받는데, 인증을 시도하면서 Authentication 을 할당받습니다. 인증에 성공하게 되면 인증필터가 SecurityContextHolder 이 감싸고 있는 SecurityContext 에 인증객체(Authentication) 를 넣습니다. 그리고 최종적으로 SecurityContext 가 HttpSession 에 저장됩니다.
인증 흐름
아래는 SecurityContextHolder 클래스의 initializeStrategy() 메서드 입니다.
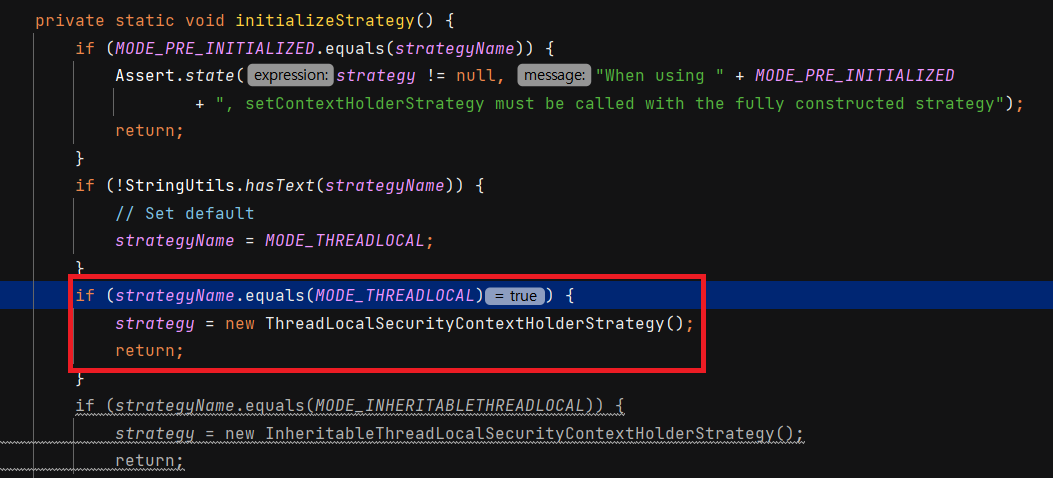
스프링 시큐리티가 초기화되는 과정에서 SecurityContext 객체 저장방식을 지정하고 있습니다.
이제 로그인을 시도해보겠습니다. 인증 성공 이후에 인증 필터인 AbstractAuthenticationProcessingFilter 의 successfulAuthentication() 메서드에서 SecurityContext 에 해당 Authentication 객체를 저장합니다.
이제 해당 Authentication 을 꺼내보겠습니다. SecurityContextHolder 에서 꺼내는 방법과 세션에서 꺼내는 방법 두가지가 있습니다.
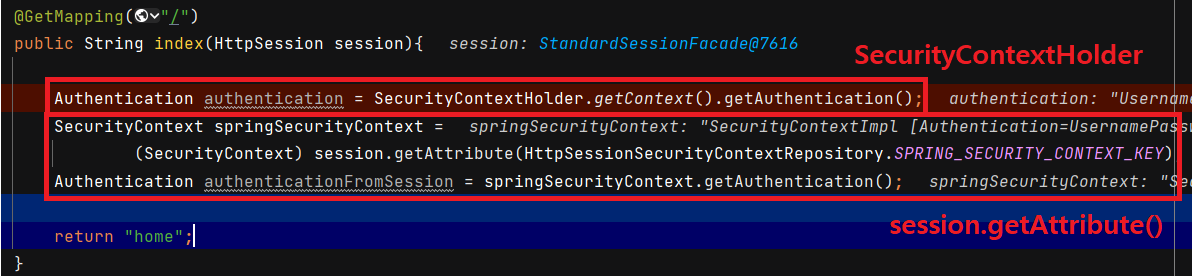
위 코드는 "/" 으로 매핑했을 때입니다. 다른 방법으로 Authentication 을 받아도 둘 다 같은 인스턴스입니다.
이번엔 자식스레드와 부모스레드 간 SecurityContext 를 공유하는지 확인해보겠습니다. 현재 ThreadLocal 에 SecurityContext 객체 저장 방식은 MODE_THREADLOCAL 입니다. 따라서 부모와 자식 쓰레드 간 SecurityContext 거 공유되지 않습니다.
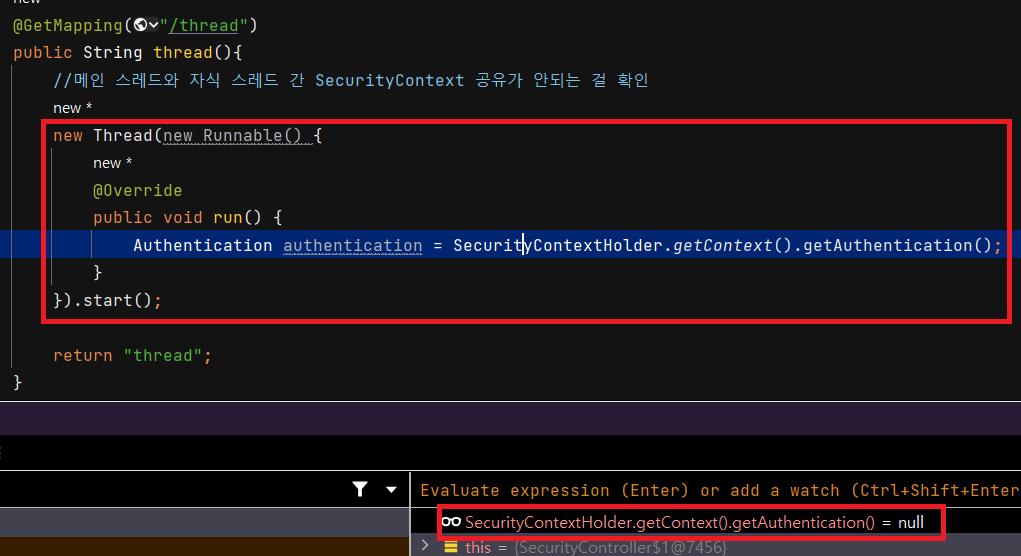
아래 빨간 박스를 보면 자식 스레드의 Authentication() 은 null 임을 알 수 있습니다.
만약 SecurityContext 를 공유하는 방식인 MODE_INHERITABLETHREADLOCAL 로 변경하려면 SecurityConfig 파일에서 다음과 같이 설정합니다.
@Configuration
@EnableWebSecurity
public class SecurityConfig extends WebSecurityConfigurerAdapter {

    @Override
    protected void configure(HttpSecurity http) throws Exception {

        http
                .authorizeRequests()
                .anyRequest().authenticated()
                .and()
                .formLogin();
		//Strategy 설정
        SecurityContextHolder.setStrategyName(SecurityContextHolder.MODE_INHERITABLETHREADLOCAL);
    }
}
` SecurityContextHolder.setStrategyName() 를 통해 SecurityContextHolder` 의 스레드 공유 방식을 설정할 수 있습니다.
인증 저장소 필터 - SecurityContextPersistenceFilter
Deprecated 되었으며 SecurityContextHolderFilter 를 사용하면 됩니다.

SecurityContextPersistenceFilter 는 SecurityContext 객체의 생성, 저장, 조회를 담당하는 필터입니다.
- 익명사용자 접근 시 ->
AnonymousAuthenticationFilter에서AnonymousAuthenticationToken객체를SecurityContext에 저장하게 됩니다. - 인증 시 ->
UsernamePasswordAuthenticationFilter에서 인증 성공 후SecurityContext에UsernamePasswordAuthentication객체를SecurityContext에 저장하게 됩니다. 인증이 최종 완료되면Session에SecurityContext를 저장합니다. - 인증된 사용자가 접근 시 ->
Session에서SecurityContext꺼내어SecurityContextHolder에 저장합니다.SecurityContext안에Authentication객체가 존재하면 계속 인증을 유지하게 됩니다. - 최종 응답 시에는 공통적으로 스레드 반환을 위해
SecurityContextHolder.clearContext()를 호출합니다.

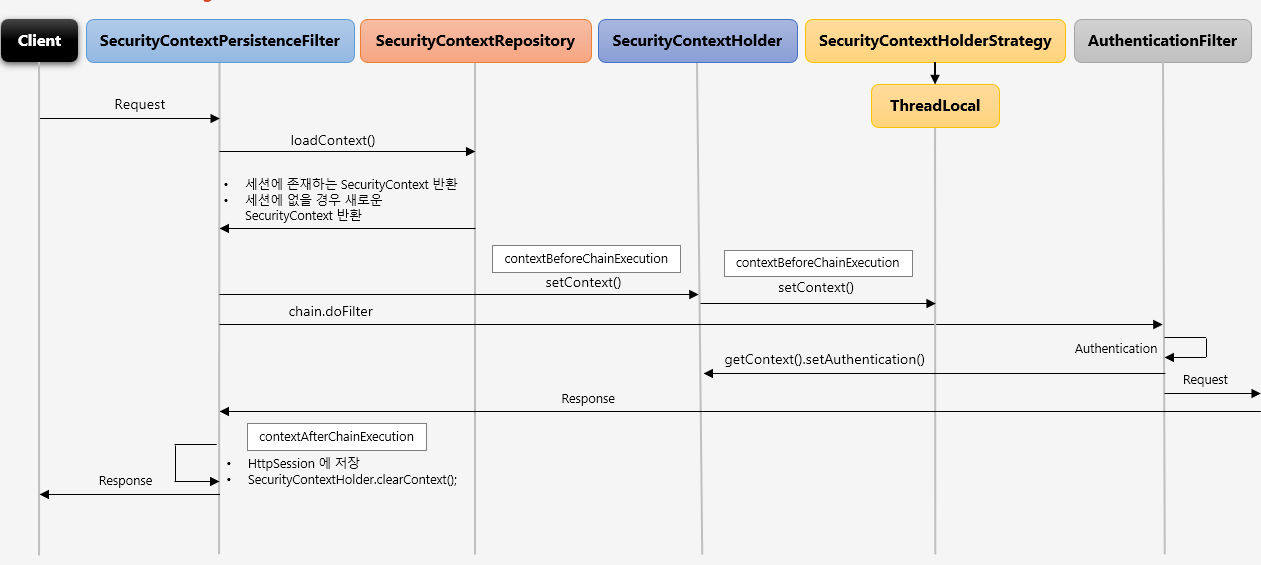
위 그림처럼 SecurityContextPersistenceFilter 는 세션에 인증정보가 있으면 바로 SecurityContext 꺼내어 SecurityContextHolder 에 저장하고, 그게 아니면 SecurityContext 를 만든 후 저장하게 됩니다.
아래와 같은 흐름으로 동작합니다.
인증 흐름 이해 - Authentication Flow
인증처리를 시작하는 시작 단계부터 각각의 인증 단계를 거쳐서 인증이 완료되는 흐름을 살펴보겠습니다.
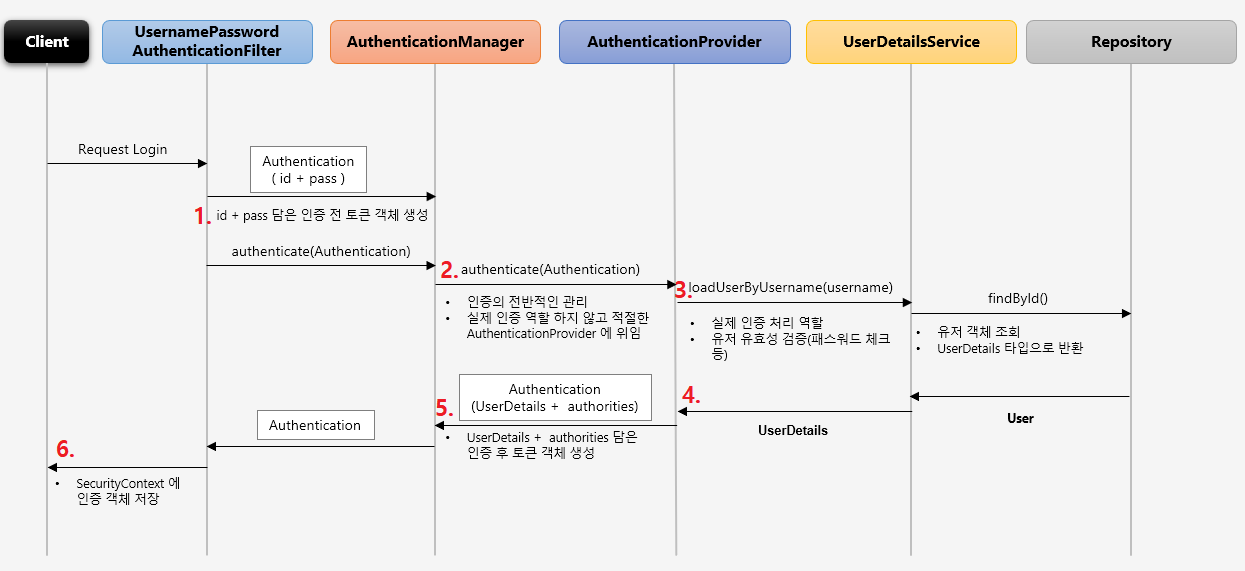
UsernamePasswordAuthenticationFilter가Authentication객체를 생성해서AuthenticationManager에게 인증을 위임합니다.AuthenticationManager은 인증의 전반적인 관리를 하지만 실제 인증역할은 하지 않습니다. 대신 내부적으로 가지고 있는List안의AuthenticationProvider중 현재 인증에 사용되는AuthenticationProvider를 찾아서 인증을 위임합니다.AuthenticationProvider는 전달받은Authentication을 통해UserDetailsService로 유저 객체를 요청합니다.UserDetailsService는 DB 에서 유저 객체를 조회합니다. 이때 예외가 발생하면 인증에 실패하게 되고, 그 예외는UsernamePasswordAuthenticationFilter가 받아서 처리하게 됩니다. 인증에 성공하면UserDetails타입으로 반환합니다.AuthenticationProvider는 ID 가 검증된UserDetails에서 PW 를 검증합니다. PW 가 일치하지 않으면BadCredentialException이 발생합니다. 검증이 완료되면Authentication에UserDetails와authorities를 담은 객체를 생성하여 반환합니다.- 최종적으로
UsernamePasswordAuthenticationFilter는SecurityContext에 인증 객체를 저장합니다.
인증 흐름
-
먼저
UsernamePasswordAuthenticationFilter에서Authentication객체를 만든 뒤AuthenticationManager로 넘깁니다.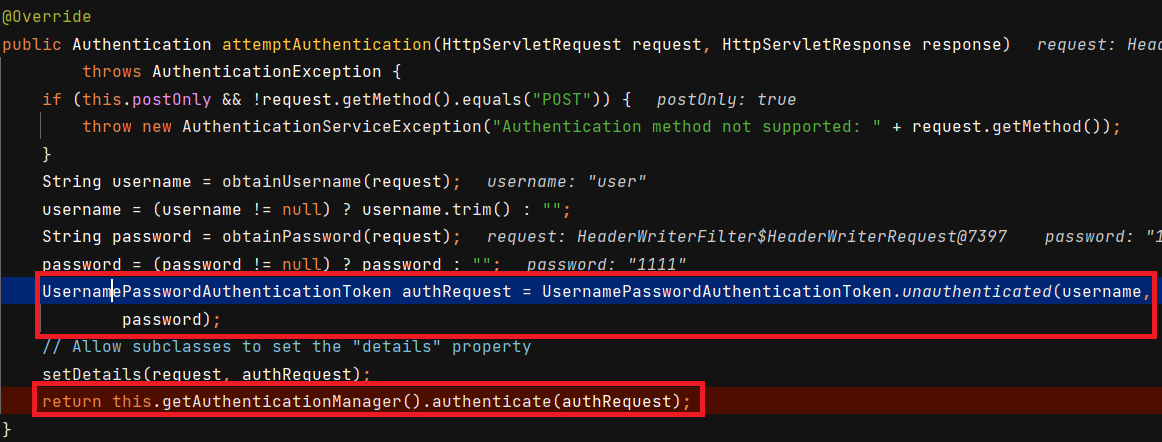
-
AuthenticationManager는 가지고 있는Provider리스트 중 반환받은Authentication(여기서는UsernamePasswordAuthenticationToken) 을 처리할 수 있는Provider를 선택해서 인증을 실시합니다.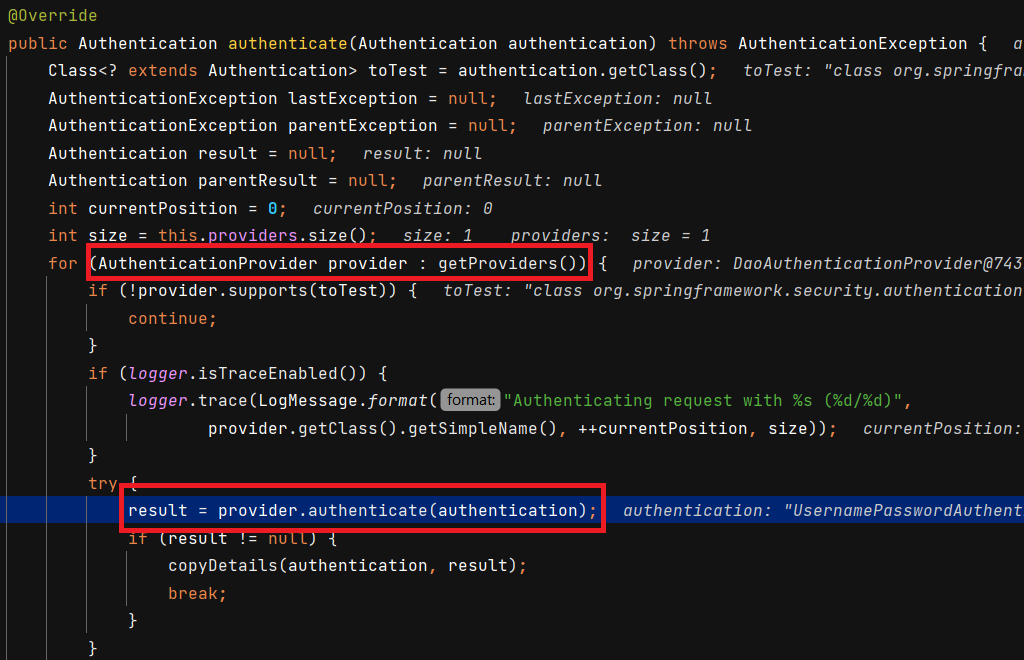
- 여기서는
DaoAuthenticationProvider가 적용됩니다.
- 여기서는
-
provider.authenticate()는DaoAuthenticationProvider.retrieveUser()를 호출합니다.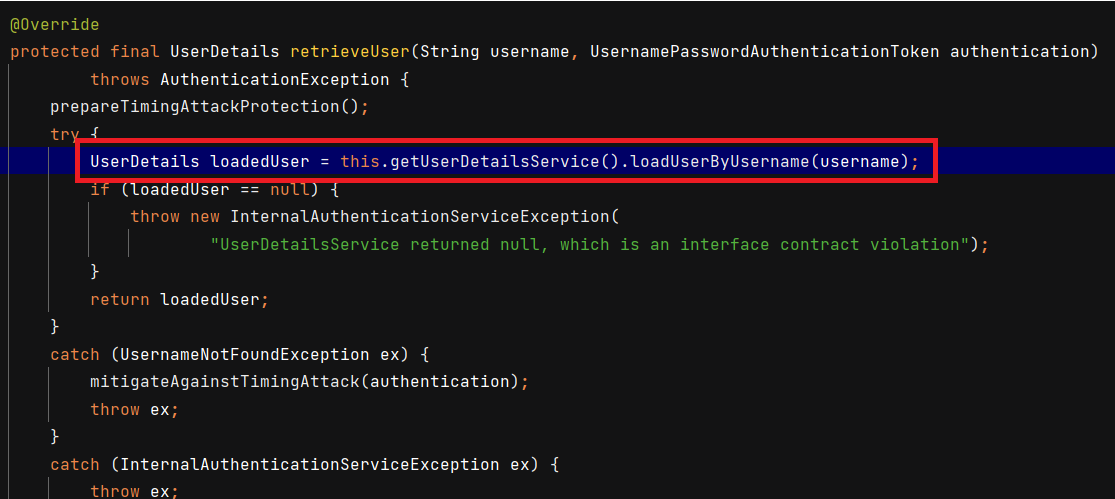
UserDetailsService에서UserDetails를 반환받습니다.
-
loadedUser가null이 아니면 ID 값은 DB 에 있는 겁니다. 이제DaoAuthenticationProvider에서 PW 를 검증하겠습니다.additionalAuthenticationChecks()메서드에서 검증합니다.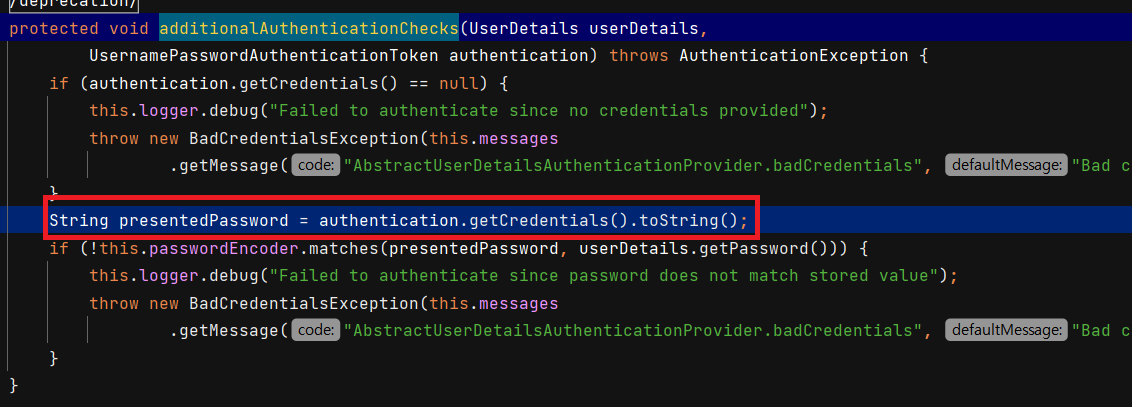
-
최종적으로
AbstractAuthenticationProcessingFilter의successfulAuthentication()메서드에서SecurityContextHolder에SecurityContext를 담습니다.
인증 관리자 - AuthenticationManager
AuthenticationManager 는 인터페이스이며, 구현체인 ProviderManager 가 인증에 따라 Provider 를 선택합니다.
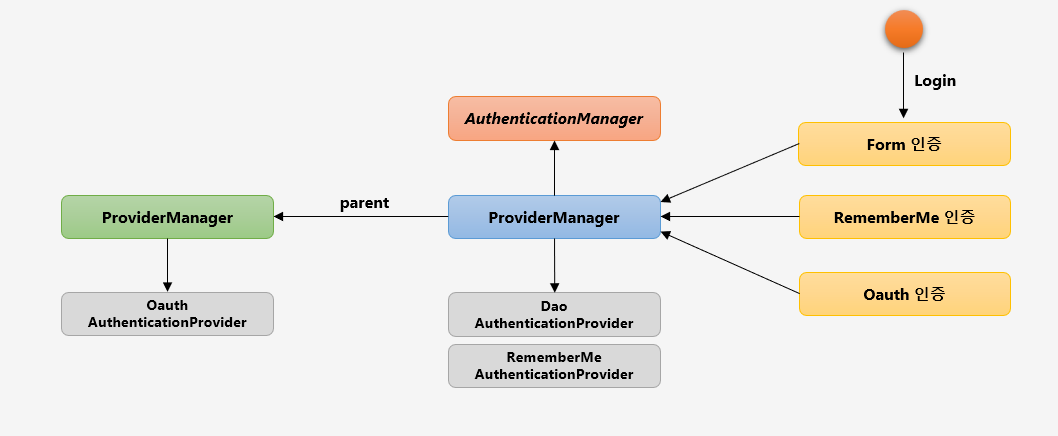
인증 필터인 AuthenticationFilter 가 Authentication 객체를 생성해서 ProviderManger 에게 넘기면, ProviderManger 는 자기가 가지고 있는 Provider 리스트를 순회하면서 해당 인증을 처리할 수 있는지 확인합니다. Form 인증은 DaoAuthenticationProvider 를, RememberMe 인증은 RememberMeAuthenticationProvider 를 사용합니다. 하지만 해당 ProviderManager 가 처리하지 못한다면 parent 를 호출해서 처리합니다.
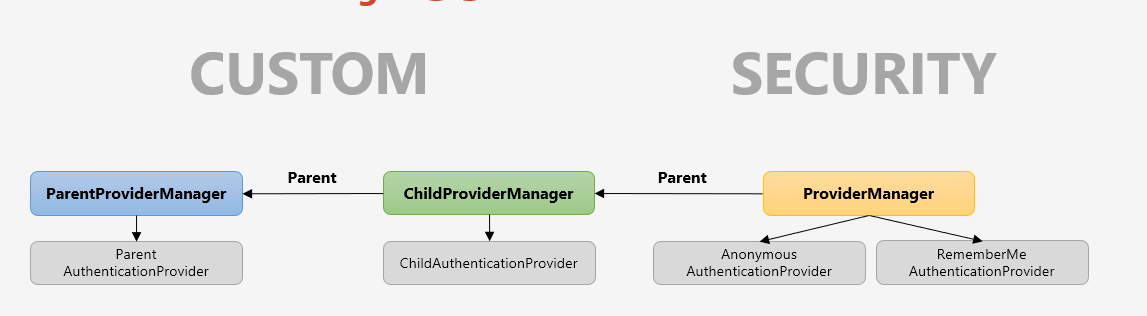
ProviderManager 는 위 그림과 같이 Linked 형태로 부모와 자식간의 관계를 형성할 수 있습니다. 자식에서 적절한 AuthenticationProvider 를 찾지 못할 경우 계속 부모로 탐색하여 찾는 과정을 반복합니다. AuthenticationManagerBuilder 를 사용해서 스프링 시큐리티의 초기화 과정에서 설정한 기본 Parent 관계를 변경해야 권한 필터에서 재 인증 시 모든 AuthenticationProvider 를 탐색할 수 있습니다.
인증 처리자 - AuthenticationProvider
이번엔 인증처리의 핵심적인 역할인 AuthenticationProvider 를 보겠습니다.

AuthenticationProvider 는 ID 검증, PW 검증, 추가 검증을 거친 후 Authentication 객체에 User 와 권한정보를 넣어서 AutenticationManager 에 다시 반환합니다. 만약 ID 검증이 실패하면 UserNotFoundException, PW 검증이 실패하면 BadCredentialException 이 터집니다.
구체적인 절차는 Authentication Flow 의 인증 흐름에서 3, 4번 절차와 같습니다.
인증 개념 및 필터 이해 - Authorization, FilterSecurityInterceptor
Authorization 은 무엇이 허가되었는지 증명하는 것입니다. 스프링은 아래와 같이 Authentication 과 Authorization 두 영역에 걸쳐 확인합니다.
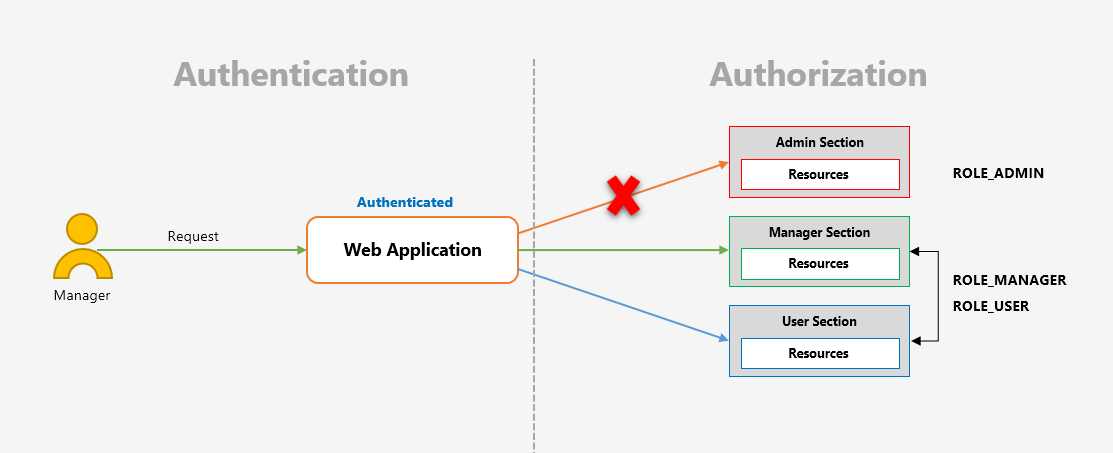
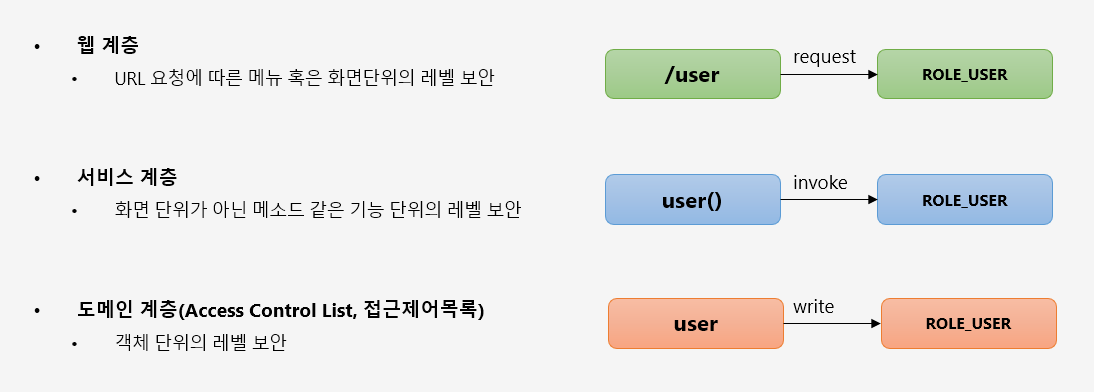
스프링 시큐리티가 지원하는 권한 계층은 웹계층, 서비스 계층, 도메인 계층이 있습니다.
FilterSecurityInterceptor
인가 처리를 하는 마지막에 위치한 필터로써, 인증된 사용자에 대하여 특정 요청의 승인/거부 여부를 최종적으로 결정합니다. 인증객체 없이 보호자원에 접근을 시도할 경우 AuthenticationException 을 발생시키고, 인증 후 자원에 접근 가능한 권한이 존재하지 않을 경우 AccessDeniedException 을 발생시킵니다.
해당 필터는 세 가지 권한 제어 방식 중 HTTP 자원의 보안을 처리하는 필터입니다. 실제적인 권한 처리는 AccessDecisionManager 에게 맡깁니다.
인증 흐름
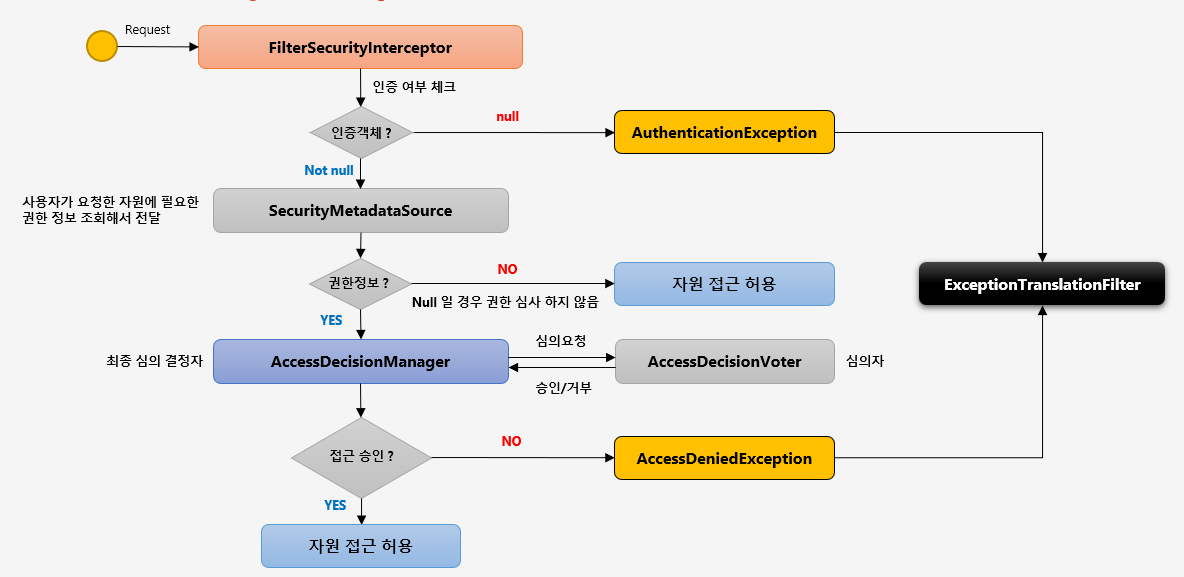
- 먼저
FilterSecurityInterceptor는 인증 여부를 체크해서 인증 객체가 없다면AuthenticationException을 발생시킵니다. SecurityMetadataSource는 요청 url 에 대한 메타정보를 가지고 있습니다. 해당 클래스를 통해 요청이 권한 정보가 필요한지 확인하고, 권한정보가 필요없다면 바로 자원 접근을 허용합니다.- 권한정보가 필요하다면
AccessDecisionManager가AccessDecisionVoter를 통해 심의하고 승인/거부 결과값을 얻습니다. - 해당 결과값에 따라 접근을 승인하거나
AccessDeniedException을 터트립니다.
인가 결정 심의자 - AccessDecisionManger, AccessDecisionVoter
스프링 시큐리디 6 버전부터는 Vote 작업과 관련된 내용이 모두 deprecate 되고 모든 처리는 AuthorizationFilter 에서 진행됩니다.
AccessDecisionManger
AccessDecisionManger 는 인증 정보, 요청정보, 권한정보를 이용해서 사용자의 자원접근을 허용할 것인지 거부할 것인지를 최종 결정하는 주체입니다. 여러 개의 Voter 들을 가질 수있으며 Voter 들로부터 접근허용, 거부, 보류에 해당하는 각각의 값을 리턴받고 판단 및 결정을 합니다. 최종 접근 거부 시 예외가 발생합니다.
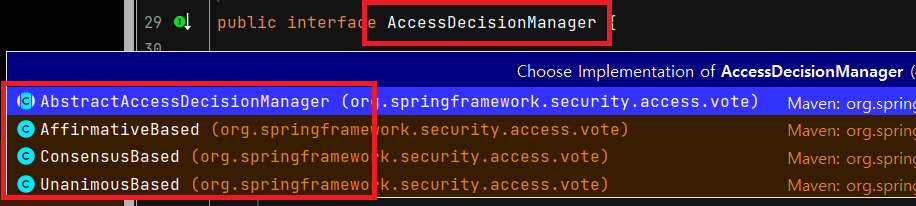
접근 결정의 유형은 아래와 같습니다.
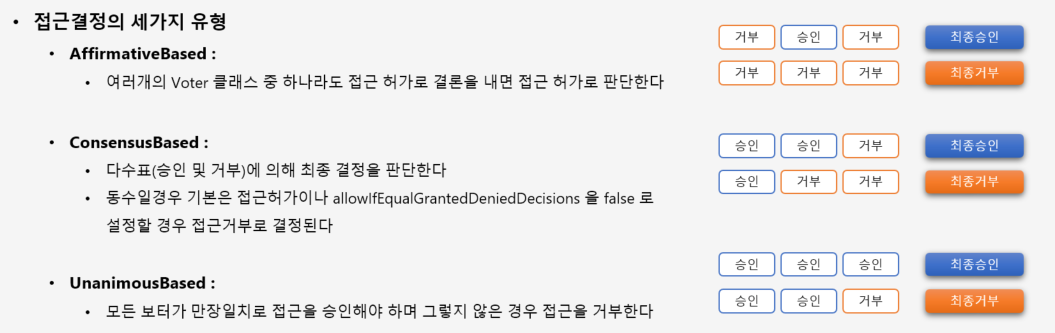
AffirmativeBased 는 AccessDecisionManger 가 가진 Voter 들 중 하나라도 승인이 나면 최종 승인합니다. ConsensusBased 는 다수표에 의해 최종 결정을 판단합니다. UnanimousBased 는 모두 승인이 나야 최종 승인합니다.
AccessDecisionVoter
인가 결정을 심사하는 위원입니다. Voter 가 권한 부여 과정에서 판단하는 자료는 아래와 같습니다.
Authentication- 인증 정보(user)FilterInvocation– 요청 정보 (antMatcher("/user"))ConfigAttributes- 권한 정보 (hasRole("USER"))
그리고 결정 방식은 총 3가지입니다.
- ACCESS_GRANTED : 접근허용(1)
- ACCESS_DENIED : 접근 거부(-1)
- ACCESS_ABSTAIN : 접근 보류(0) Voter 가 해당 타입의 요청에 대해 결정을 내릴 수 없는 경우
인증 흐름
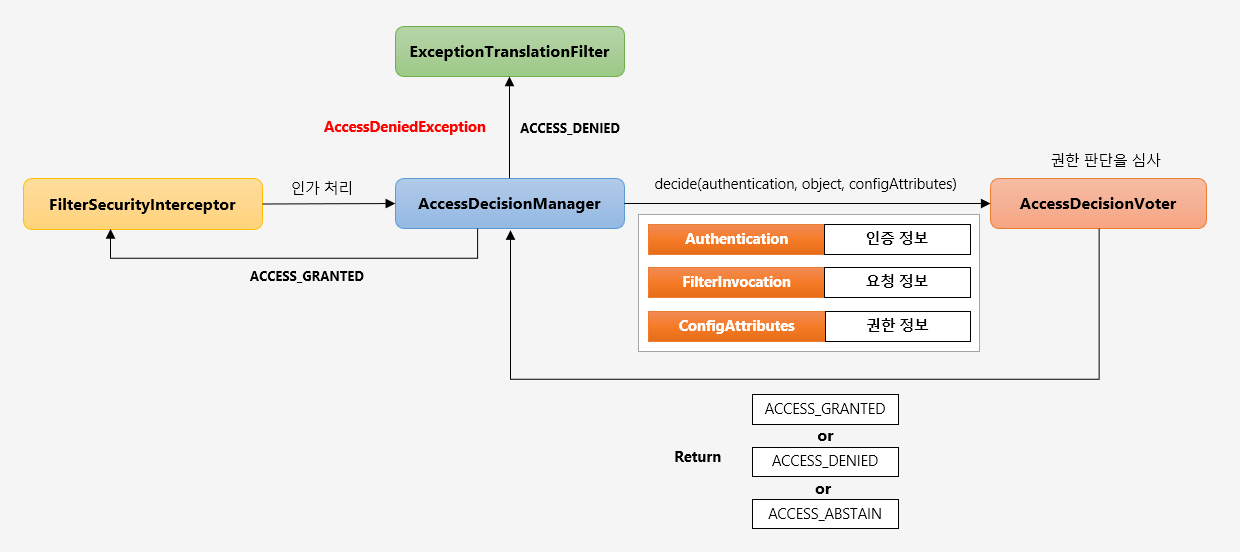
FilterSecurityInterceptor 가 AccessDecisionManager 에게 인가 처리를 요청하면 권한 판단 심사 후 접근이 허용되면 ACCESS_GRANTED 를 반환하고, 거부되면 ExceptionTranslationFilter 에서 ACCESS_DENIED 를 반환해 예외를 터트립니다.
코드 레벨
AccessDecisitionManger 는 인터페이스로, 구현체는 아래와 같습니다.
이제 로그인을 시도해보겠습니다. FilterSecurityInterceptor 의 상위 클래스인 AbstractSecurityInterceptor 의 attemptAuthorization() 에서 AccessDecisitionManger 에게 인가처리 요청을 합니다.
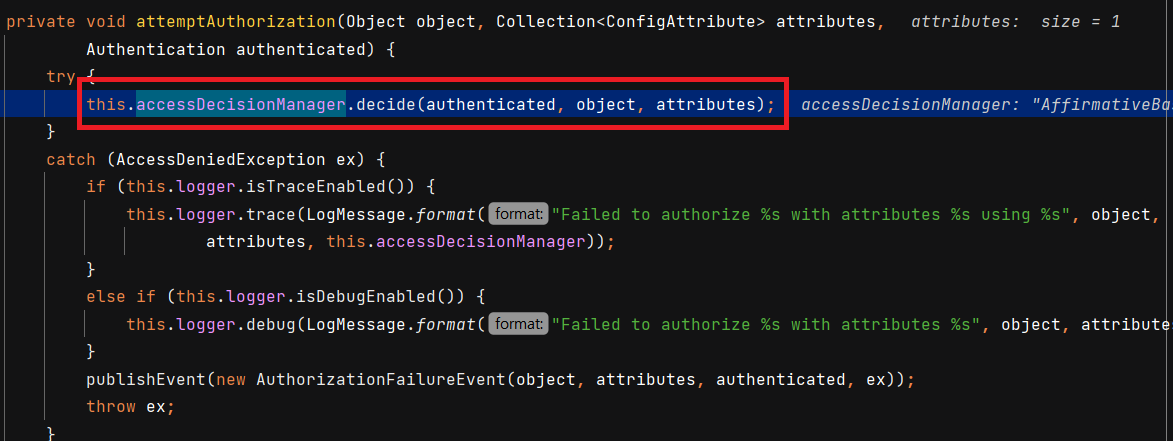
기본 AccessDecisitionManger 는 AffirmativeBased 입니다. voter 들을 순회하면서 하나라도 승인이나면 return 합니다.
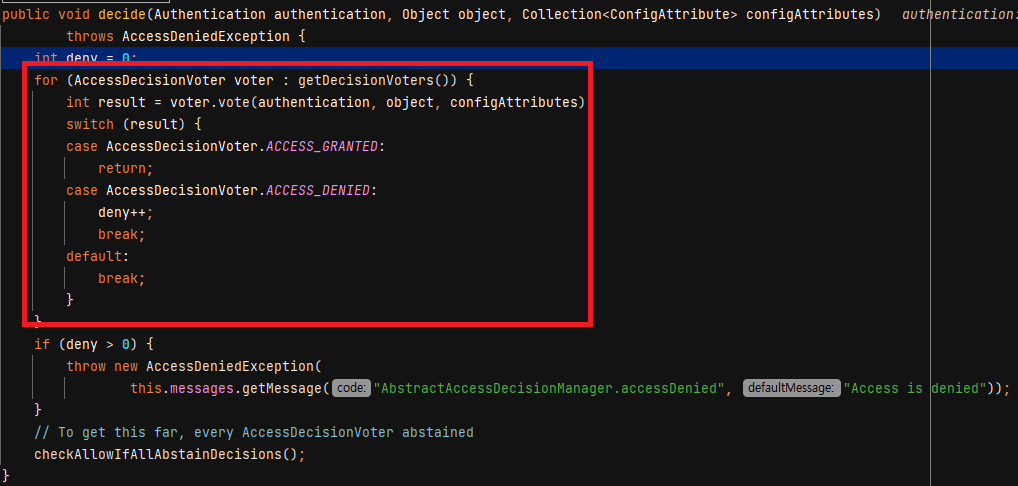
현재는 Voter 가 1개밖에 없지만 사용자가 추가할 수 있습니다.
스프링 시큐리티 필터 및 아키텍처 정리
SecurityConfig에서 정보를 읽어서FIlterChainProxy에filters가 생성됩니다.- DelegatingFilterproxy 는 하나의 서블릿 필터로, 인증요청에 대해 springSecurityFilterChain 이라는 스프링 빈을 찾아 위임합니다.
FilterChainProxy는 요청을 받으면 필터 순서대로 요청을 처리합니다.


댓글남기기