[Spring] Hamcrest 과 custom Matcher
Hamcrest
Hamcrest 는 JUnit 기반의 단위 테스트에서 사용할 수 있는 Assertion Framework 입니다. Assertion을 위한 매쳐(Matcher)가 자연스러운 문장으로 이어지므로 가독성이 향상된다는 장점이 있습니다.
Hamcrest 는 org.hamcrest:hamcrest 의존성을 주입해줘야 하는데요. 다행히 spring-boot-starter-test 에 있습니다.
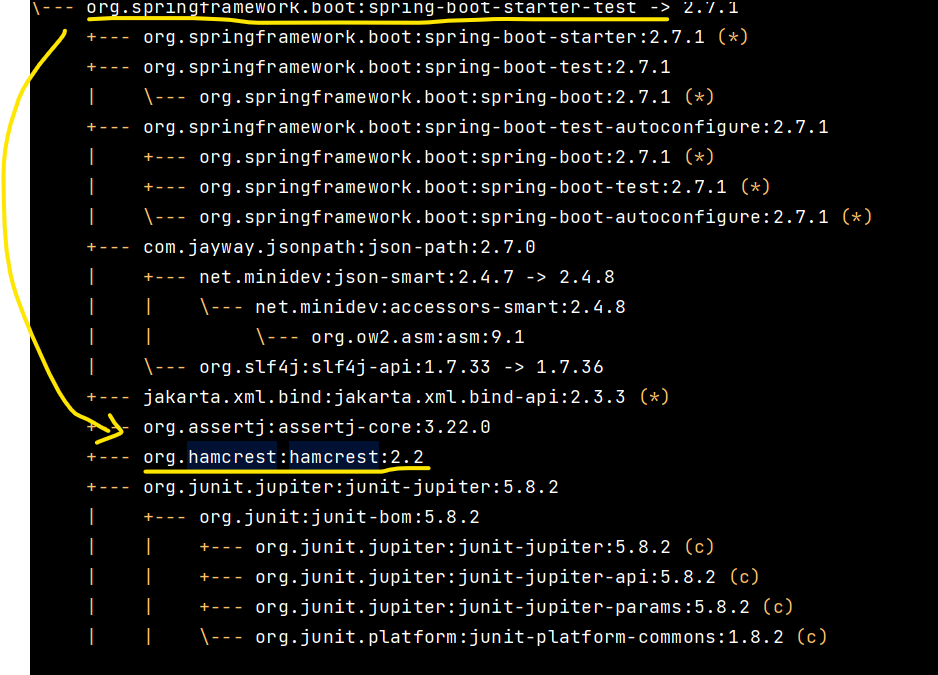
콘솔창에 ./gradlew dependencies 라고 하면 위와 같이 나옵니다.
메서드 종류는 해당 docs 에서 참고했습니다. API reference
is(), equalTo()
public class HelloHamcrestTest {

    @Test
    public void assertionTest() {
        Coffee coffee = new Coffee();
        coffee.setCoffeeCode("123");

        Coffee coffee2 = new Coffee();
        coffee2.setCoffeeCode("123");

        assertThat(coffee, equalTo(coffee2));
    }
}
equalTo() 는 actual 과 expected 값을 equals() 메서드로 비교합니다.
is() 는 내부적으로 아래와 같이 사용됩니다.
public class Is<T> extends BaseMatcher<T> {

    public static <T> Matcher<T> is(T value) {
            return is(equalTo(value));
        }
    }
즉, is는 equalTo를 디폴트 매처로 사용하기 때문에 결국 equals() 메서드를 사용하게 됩니다.
일반적으로, Hamcrest의 is와 equalTo는 같은 행동을 보이므로, 대부분의 경우에 둘 중 어느 것을 사용해도 무방합니다. 둘다 객체의 동일성과 동등성을 확인합니다. 다만, 코드의 가독성을 생각해서 짜는 게 좋습니다. 예를 들어, assertThat(x, is(y))는 자연스러운 영어 문장처럼 읽힙니다. 반면에, assertThat(x, equalTo(y))는 조금 더 기술적인 어투입니다.
notNullValue(), nullValue()
@Test
public void assertionTest() {
	String n = null;
	String NotN = "null";
	assertThat(n, is(nullValue()));
	assertThat(n, is(notNullValue()));
}
allOf(), anyOf()
allOf() 는 Matcher 를 파라미터로 받아서, 해당 조건이 다 만족하면 검증이 됩니다. anyOf() 또한 Matcher 를 파라미터로 받지만 하나라도 만족하면 검증이 됩니다.
@Test
@DisplayName("hamcrest allOf(), anyOf() 테스트")
void hamcrestAllOfAnyOfTest() {
    assertThat("123", allOf(startsWith("1"), containsString("2"), endsWith("3"))); //전부 다 맞아야 통과
    assertThat("123", anyOf(startsWith("1"), containsString("2"), endsWith("3"))); //하나라도 맞으면 통과

    assertThat("123", not(allOf(startsWith("1"), containsString("2"), endsWith("4")))); //하나라도 틀리면 실패
    assertThat("123", not(anyOf(startsWith("0"), containsString("2"), endsWith("4")))); //다 틀리면 실패
}
hasToString()
Actual 값을 ToString 으로 바꿨을 때 해당값을 가지고 있는지 보는 메서드입니다.
@Test
@DisplayName("hamcrest hasToString() 테스트")
void hamcrestHasToStringTest() {
    assertThat("123", hasToString("123"));
    assertThat("123", hasToString(endsWith("3")));

    Coffee coffee = new Coffee();
    assertThat(coffee, hasToString(containsString("Coffee"))); //coffee 의 주소값은 "Coffee" 를 포함합니다.
}
instanceOf(), sameInstance()
instanceOf() 는 해당 인스턴스가 특정 클래스인지 검증하는 메서드며, sameInstance() 은 같은 객체인지 검증하는 메서드입니다.
@Test
@DisplayName("instanceOf(), sameInstance() 테스트")
void instanceOfSameInstanceTest() {
    assertThat("123", instanceOf(String.class));
    assertThat("123", not(instanceOf(Integer.class)));

    Coffee coffee1 = new Coffee();
    Coffee coffee2 = coffee1;
    assertThat(coffee1, sameInstance(coffee2));
}
hasEntry(), hasKey(), hasValue()
Map 에 해당 entry, key, value 가 있는지 확인합니다.
@Test
@DisplayName("hasEntry(), hasKey(), hasValue() 테스트")
void hasEntryHasKeyHasValueTest() {
    HashMap<String, Integer> map = new HashMap<>();
    map.put("price1", 2000);
    map.put("price2", 3000);

    assertThat(map, hasEntry("price1", 2000));
    assertThat(map, hasEntry("price2", 3000));

    assertThat(map, hasKey("price1"));
    assertThat(map, hasKey("price2"));

    assertThat(map, hasValue(2000));
    assertThat(map, hasValue(3000));
}
hasItem(), hasItems()
hasItem(), hasItems() 는 Iterable 클래스가 해당 원소를 가지고 있는지 확인합니다.
@Test
@DisplayName("hasItem, hasItems 테스트")
void hasItemHasItemsTest() {
    List<String> list = List.of("1", "2", "3", "4", "5");

    assertThat(list, hasItem("1"));
    assertThat(list, hasItem("2"));
    assertThat(list, hasItem("3"));
    assertThat(list, hasItem("4"));
    assertThat(list, hasItem("5"));
    assertThat(list, not(hasItem("6")));
    assertThat(list, hasItem(endsWith("5")));

    assertThat(list, hasItems("1", "2", "3", "4", "5"));
    assertThat(list, hasItems("2", "3", "4", "5"));
    assertThat(list, not(hasItems("2", "3", "4", "5", "6")));
}
hasItemInArray()
배열에서 해당 값이 있는지 확인합니다.
    @Test
@DisplayName("hasItemInArray() 테스트")
void hasItemInArrayTest() {
    String[] array = {"1", "2", "3", "4", "5", "66"};

    assertThat(array, hasItemInArray("1"));
    assertThat(array, hasItemInArray("2"));
    assertThat(array, hasItemInArray("3"));
    assertThat(array, hasItemInArray("4"));
    assertThat(array, hasItemInArray("5"));
    assertThat(array, not(hasItemInArray("6")));
    assertThat(array, hasItemInArray(endsWith("6")));

}
기타
그밖에도 아래와 같은 다양한 메서드를 지원합니다.
greaterThan,greaterThanOrEqualTo,lessThan,lessThanOrEqualToequalToIgnoringCase: 대소문자를 무시하고 비교합니다.equalToIgnoringWhiteSpace: 공백을 무시하고 비교합니다.containsString,endsWith,startsWith
에러 검증
예외에 대한 테스트는 Hamcrest 만으로 Assertion 을 구성하기 듭니다. 따라서 아래와 같이 JUnit 의 assertThrows() 메서드를 이용해서 assertThrows()의 리턴 값을 전달받은 후에 assertThat(actualException.getClass(), is(NullPointerException.class)); 을 통해 throw 된 Exception 타입이 기대했던 Exception 타입과 일치하는지 추가로 검증을 진행합니다.
 @Test
public void assertionTest() {
    Throwable actualException = assertThrows(NullPointerException.class, () -> {
                throw new NullPointerException();
            });

    assertThat(actualException.getClass(), is(NullPointerException.class));
}
만약 Hamcrest 만으로 던져진 예외를 테스트하기 위해서는 Custom Matcher 를 직접 구현해서 사용할 수 있습니다.
Hamcrest 의 Custom Matcher
에러를 검증하는 Custom Matcher 를 만들어보겠습니다. 그전에 간단하게 String 이 숫자로 이루어져있는지 검증하는 isOnlyDigits 클래스부터 만들면서 알아보겠습니다.
isOnlyDigits
public class IsOnlyDigits extends TypeSafeMatcher<String> {

    @Override
    protected boolean matchesSafely(String actualValue) {
        try {
            Integer.parseInt(actualValue);
            return true;
        } catch (NumberFormatException nfe){
            return false;
        }
    }

    @Override
    public void describeTo(Description description) {
        description.appendText("only digits");

    }

    public static Matcher<String> onlyDigits() {
        return new IsOnlyDigits();
    }
}
IsOnlyDigits 클래스는 TypeSafeMatcher클래스를 상속받습니다. 이때 제네릭은 실제로 받을 actual value 의 타입입니다. IsOnlyDigits 을 통해 "1234" 와 같은 String 을 받아서 Digits 인지 확인할 것이기 때문에 제네릭은 String 입니다.
matchesSafely() 메서드는 actualValue 를 파라미터로 받습니다. (원래 Overriding 을 하면 item 이라고 되어있는데 헷갈리지 않게 변경했습니다.) 그리고 boolean 값으로 성공인지 실패인지 검증해서 리턴합니다. 즉, 검증 로직은 `matchesSafely` 내에서 진행됩니다.
onlyDigits() 메서드는 IsOnlyDigits 클래스를 리턴합니다. 실질적으로 Test 에서 사용되는 메서드입니ㅏㄷ.
describeTo() 메서드는 검증이 실패했을 때 보여주는 값입니다.
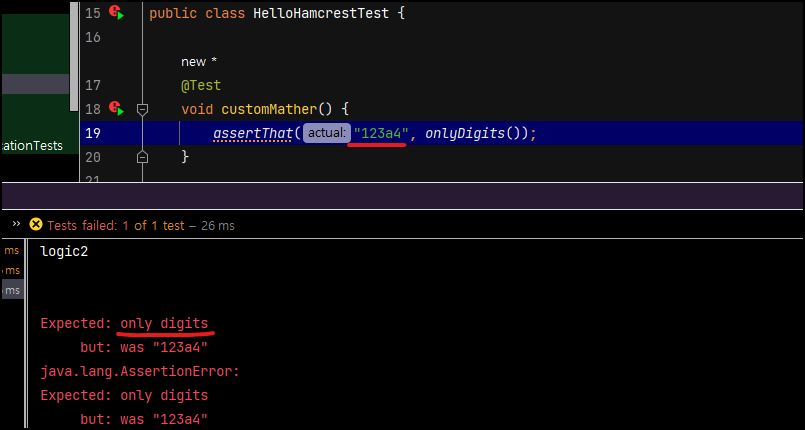
위 사진처럼, Expected 에 표시됩니다. 만약 onlyDigits(...) 에서 파라미터를 받는다면 해당 값을 보여줄 수도 있습니다.
아래는 성공 케이스입니다.
 @Test
void customMather() {
    assertThat("1234", onlyDigits());
}
onlyDigits() 가 실행되어 IsOnlyDigits 클래스가 반환됩니다. 해당 클래스에서 matchesSafely("1234") 를 실행시키고 boolean 값을 반환합니다.
IsExceptionOf
이번에는 예외를 검증하는 Exception 클래스입니다. 먼저 Junit 의 예외검증 메서드인 assertThrows() 메서드를 보겠습니다.
@Test
    void customMather2() {
        assertThrows(NullPointerException.class, () -> logic());
    }

    void logic(){
        throw new NullPointerException();
    }
간단한 로직이라서 괜찮지만, NullPointerException.class 는 결과이고 () -> logic() 는 행동이 되니까 읽기에 불편합니다. 기존의 Hamcrest 는 Actual is Expected, Actual is NotNull 과 같은 형식이었다면 assertThrows() 는 error, Exception, caused By logic 과 같이 되겠네요. 이거를 보기 좋게 logic cause Exception 으로 고쳐보겠습니다.
처음에는 아래와 같은 형식을 만들어놓고 고치려고 했는데요.
assertThat(logic(), cause(NullPointerException.class));
하지만 여기에는 큰 문제가 있습니다. logic() 이 실행되는 시점에서 Hamcrest 의 assertThat 이 자동으로 캐치해서 동작하지 않는다는 것입니다. 즉 logic() 이 Exception 을 던지면 그대로 빨간 불로 끝납니다. 이를 해결하기 위해서는 2가지 방법이 있는데요.
-
try ~ catch문 사용try{ logic() }catch(Throwable e){ assertThat(e.getclass, cause(NullPointerException.class)); } -
Executable사용assertThat(()-> logic(), cause(NullPointerException.class));
일단 저는 당연히 가독성을 위해 2번을 골랐습니다. 이렇게 하고 해당 Executable 로직이 실행되면 logic() 을 실행하고, Throwable 을 반환하는 when() 메서드를 사용해보겠습니다.
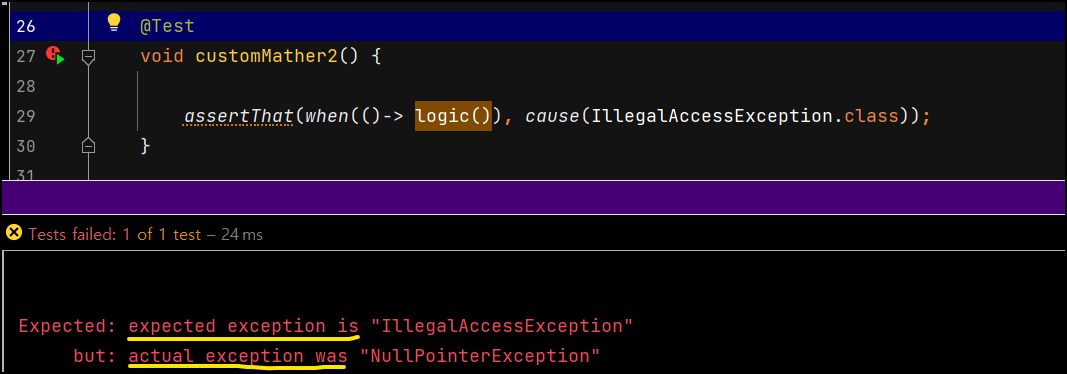
assertThat(when(()-> logic()), cause(NullPointerException.class));
음… 가독성이 점점 떨어지는 것 같은데요. 어쨋든 모두 assertThat 으로 통일하면서 when A cause B 정도의 가독성은 얻은 것 같습니다. 제가 만들어서 잘 읽히는건가요?
이제 IsExceptionOf 코드를 보겠습니다.
package com.codestates;

import org.hamcrest.Description;
import org.hamcrest.Matcher;
import org.hamcrest.TypeSafeMatcher;
import org.junit.jupiter.api.function.Executable;

public class IsExceptionOf extends TypeSafeMatcher<Throwable> {

    private final Class<? extends Throwable> expectedException;

    private IsExceptionOf(Class<? extends Throwable> expectedException) {
        this.expectedException = expectedException;
    }

    public static Matcher<Throwable> cause(Class<? extends Throwable> expectedException) {
        return new IsExceptionOf(expectedException);
    }

    public static Throwable when(Executable method) {

        try{
            method.execute();
        }catch(Throwable e){
            return e;
        }
        return null;
    }

    @Override
    protected boolean matchesSafely(Throwable e) {
        return expectedException.equals(e.getClass());
    }

    @Override
    public void describeTo(Description description) {
        description.appendText("expected exception is ").appendValue(expectedException.getSimpleName());
    }

    @Override
    protected void describeMismatchSafely(Throwable item, Description mismatchDescription) {
        mismatchDescription.appendText("actual was ").appendValue(item.getClass().getSimpleName());
    }
}
하나하나 보겠습니다.
필드, 생성자, cause() 메서드
public class IsExceptionOf extends TypeSafeMatcher<Throwable> {

    private final Class<? extends Throwable> expectedException;

    private IsExceptionOf(Class<? extends Throwable> expectedException) {
        this.expectedException = expectedException;
    }

    public static Matcher<Throwable> cause(Class<? extends Throwable> expectedException) {
        return new IsExceptionOf(expectedException);
    }
expectedException 는 생성자를 통해서 주입받습니다. 기대되는 Exception 값입니다. 생성자는 직접적으로 사용할 일이 없으므로 private 으로 막아둡니다.
cause 는 테스트 코드에서 직접 사용하는 메서드입니다. expectedException 을 받아서 생성자를 통해 객체에 주입한 후 해당 객체를 반환합니다.
when() 메서드
public static Throwable when(Executable method) {
    try{
        method.execute();
    }catch(Throwable e){
        return e;
    }
    return null;
}
when() 메서드는 꼭 여기있지 않아도 상관없습니다. 오히려 공통으로 사용하기 위해 빼놓는게 낫겠죠. 물론 Throwable 자체를 리턴하는거니까 여기에서밖에 쓸 일이 없겠지만요. Executable 를 파라미터로 받아서 실행시킨 후, Exception 이 발생하면 그대로 해당 클래스를 리턴해줍니다. 이 리턴값은 matchesSafely() 메서드에서 사용하게 됩니다.
matchesSafely() 메서드
@Override
protected boolean matchesSafely(Throwable actualException) {
    return expectedException.equals(actualException.getClass());
}
해당 메서드는 간단히 비교만 합니다. expectedException 과 actualException 을 비교해서 boolean 값을 리턴합니다.
describeTo() 메서드, describeMismatchSafely() 메서드
@Override
public void describeTo(Description description) {
    description.appendText("expected exception is ").appendValue(expectedException.getSimpleName());
}

@Override
protected void describeMismatchSafely(Throwable actualException, Description mismatchDescription) {
    mismatchDescription.appendText("actual exception was ").appendValue(actualException.getClass().getSimpleName());
}
해당 메서드들은 mismatch 상황에서 쓰이게 됩니다. 콘솔창에서 보는게 이해가 빠르겠네요.
Expected 에는 describeTo() 메서드에서 붙인 expected exception is 가 출력되고 expectedException.getSimpleName() 가 출력됩니다. 그리고 but 에는 describeMismatchSafely() 메서드에서 붙인 actual exception was 가 출력되고 이후에 actualException.getClass().getSimpleName() 이 출력됩니다. 이걸로 에러 메세지도 가독성을 향상시킬 수 있습니다.


댓글남기기